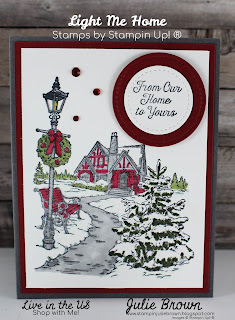
I'd love to hear what you think so please scroll to the bottom and leave me a comment. Also if you'd like to get a notice each time I add a new card just add your email to the right under the "Follow Me" title.
Here's a video of this card just click on the link below! I'm also including the step by step instructions below!
https://www.facebook.com/819342075094869/videos/133701435100315
Cut and Card Base instructions:
Card Base = Basic Gray - 5 1/2 x 8 1/2 scored at 4 1/4
Layer 1 - Cherry Cobbler - 4 x 5 1/4
Layer 2 - Whisper White - 4 x 5 1/4 (cut down to 3 3/4 x 5 after stamping)
Layer 3 - Whisper White - 2 x 2
Layer 4 - Cherry Cobbler - 2 1/4 x 2 1/4
Layer 5 - Whisper White - 4 x 5 1/4
Instructions:
- Layer 1 - Adhere to card front.
- Layer 2 - Using Black Memento Ink stamp image onto sheet. Make sure to center the image. Then trim down to 3 3/4 x 5.
- Color in the image with the following Stampin Blends.
- Cherry Cobbler, Smokey Slate, Mossy Meadow, Pool Party and Daffodil Delight
- Daffodil Delight was used for the light in the light pole
- Light Pool Party was used to trace the lines in the snow to give it a little pop.
- Adhere to the card front.
- Add Wink of Stella to the snowy parts.
- Layer 3 - Stamp sentiment in Black Memento ink then cut out with smallest Circle from the Stitched Shapes Dies.
- Layer 4 - Cut out with the next largest Circle from the Stitched Shapes Dies.
- Adhere Layer 3 to Layer 4
- Adhere both to the card front as shown using Stampin Dimensionals.
- Layer 5 - Stamp sentiment in Basic Black onto the center of sheet then adhere to the inside of the card.
- Using the Dark Cherry Cobbler color in three rhinestones then add to card front as shown.
So there it is a really easy card and the coloring goes pretty quick. I wasn't sure I was going to like the Cherry Cobbler and Basic Gray combo but in the end I loved it! Thanks again for stopping by my goal is to in some way inspire those who visit so I hope I have accomplished that with this card!
If you need any of the supplies to complete this card just click on any of the pictures below and you will be directed to by online store! Happy Stamping!


No comments:
Post a Comment