Welcome to my blog! Today I have three cards all using the Encircled in Friendship bundle by Stampin Up® plus some friends?
These cards were a blast to design. I don't know about you but I sometimes forget to mix and match my stamp sets and dies. I tend to get in a rut and only use Stamps sets and dies that come in a bundle. So today I'm climbing out of my rut and playing with several sets all together. I hope you enjoy them!
Don't forget if you'd like to be notified when I post a new blog just add your email to the right under the follow me section and you will know each time I add a new card!
At the end of the post I will add the link for the video I did with all of these cards so be watch for it!
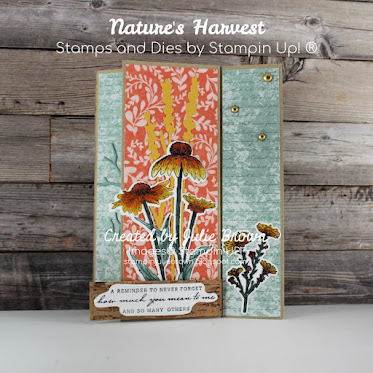
So here we go! First up is the Encircled in Friendship paired up with Party Pattern Designer Series Paper and the In Bloom Stamp set. For this card I wanted to design my own background for the die cut out!

Card Base - Granny Apple Green - 5 1/2 x 8 1/2 scored at 4 1/4
Layer 1 - Pattern Party DSP - 4 x 5 1/4
Layer 2 - Basic White - 4 x 4
Layer 3 - Basic White - 2 1/4 x 2 1/4
Layer 4 - Basic White - 4 x 5 1/4
Instructions:
1. Wrap ribbon around Layer 1 as shown then adhere to the card front.

3. Using the same dies cut out one small scalloped die as shown. Stamp the sentiment as shown then add to the bottom right of the card front with Dimesionals as shown.
4. Tie a bow with the ribbon and using Mini Glue dots adhere to the card front as shown.
5. Stamp Layer 4 as shown then adhere to the inside of the card.
Remember there will be a link to a video for all these cards after the last card!
Supply List for Card 1 - To order any supplies just click on the pics below
Product List ")

 Host Designer Series Paper")


 Glittered Organdy Ribbon")

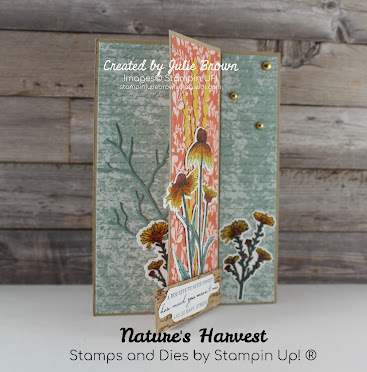
Next we have the Encircled in Friendship Bundle paired up with the Seasonal Labels Dies. Did you notice that these dies will cut a strip in the label to allow a ribbon to be threaded through the label!

Card Base - Thick Basic White - 5 1/2 x 8 1/2 scored at 4 1/4
Layer 1 - Pattern Party DSP - 4 x 5 1/4
Layer 2 - Pattern Party DSP - 2 3/4 x 4 1/4
Layer 3 - Basic Black - 2 1/2 x 3 1/2
Layer 4 - Basic White - 2 1/2 x 2 1/2
Layer 5 - Basic White - 2 1/2 x 3
Layer 6 - Basic Black - 4 x 5 1/4
Layer 7 - Basic White - 3 3/4 x 5 
Instructions:
1. Adhere Layer 2 to Layer 1 about 5/8" from top edge and flush with the left side.
2. Using the Seasonal Label Dies cut out the label from Layer 3 (make sure to use the small dies that cut out the strip for threading the ribbon).
3. Wrap ribbon around Layers 1 & 2 then thread through the Label as shown. Adhere label to card front as shown and tie a know in the ribbon.
4. Layer 4 - Using the Encircled in Beauty Dies cut out the small detailed circle as shown, stamp the sentiment then add to card front using dimensionals as shown.
5. Layer 5 - Stamp the flowers from the Encircled in Friendship stamp set in Black Memento ink then color in with Stampin Blends. Then fussy cut out around flowers and adhere them to the card front in the bottom right corner as shown. Add Matte Black Dots as shown.
6. Layer 6 - Adhere to the inside of the card.
7. Layer 7 - Stamp as shown color in flowers then adhere to the inside of the card.
Supply List for Card 2 -
Product List 


 Striped Grosgrain Ribbon")

Now for the last card! This card was designed using the Encircled in Friendship Bundle and the Penguin Place Bundle! Please note that the Designer Series Paper used for this card is a Sale A Bration item!
(For every $50 you spend you get to pick a free Sale A Bration item August 3rd - September 30th 2021)
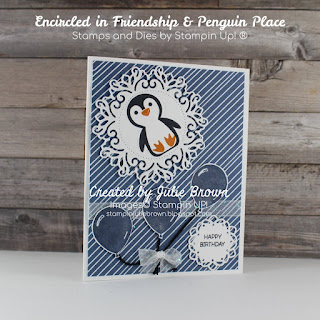
Card Base - Thick Basic White - 5 1/2 x 8 1/2 scored at 4 1/4
Layer 1 - Penquin Playmates DSP - 4 x 5 1/4
Layer 2 - Basic White - 4 x 5 1/4
Layer 3 - Basic White - 1 3/4 x 5 1/4
Layer 4 - Basic White - 4 x 5 1/4

Instructions:
1. Wrap Ribbon around lower section then adhere Layer 1 to card front.
2. Layer 2 - Using the Encircled in Beauty Dies cut out the two circles pictured. Set aside.
3. Layer 3 - Using the Penguin Place stamp set, stamp One penguin in Black Memento ink (I used Pumpkin Pie for the nose and feet) and three Balloons in Misty Moonlight ink.
4. Using the Penguin Builder Punch, punch out the penguin and adhere to the largest Circle die as shown. Then fussy cut the three balloons.
5. Adhere the Large circle with penguin onto the card front as shown using demensionals.
6. Using Mini Glue dots adhere the black twine as shown (keep glue dots on just the ends). Then adhere the balloons as shown.
7. Using Black Memento ink stamp the sentiment as shown onto the small circle die. Then adhere to the lower right hand corner as shown.
8. Using Wink of Stella color in the balloons.
9. Tie a bow with the ribbon and add to the card front as shown.
10. Layer 3 - Stamp as shown on then adhere to the inside of the card.
Supply List Card 3 (Note to order any supplies just click on the pictures)
Product List ")

 Designer Series Paper")


 Glittered Organdy Ribbon")


Here is the video link: https://www.youtube.com/watch?v=E-9GI_HqyEc
Don't forget to leave me a comment below!


")
")


 Specialty Paper")


