Saturday, October 24, 2020

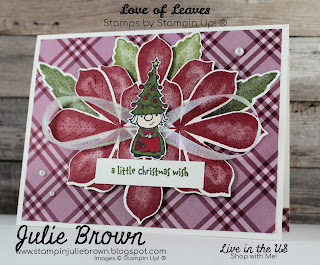
Love of Leaves and Gnome for the Holidays


 Thanks for stopping by my blog!  I hope that I can help inspire you with my cards!  Making cards is a way for me to relax and let my creativity bloom.  For this card I combined the Love of Leaves Bundle and the Gnome for the Holidays Stamp set all by Stampin Up®.  I really wanted to find a way to use a fall stamp set and turn it into a Christmas Card.  This is my finished product!  Let me know what you think in the comments below!  

Here's a video link for this card and a fall card that I did with the Love of Leaves bundle!


https://www.facebook.com/StampinJulieBrown/videos/836220307205766


Instructions:

Card Base and cuts:  (DSP - Designer Series Paper)

Card Base - 5 1/2 x 8 1/2 scored at 4 1/4

Layer 1 - Plaid Tidings DSP - 4 x 5 1/4

Layer 2 - Whisper White - 5 1/2 x 8 1/2 

Layer 3 - Whisper White - 1/2 x 2 1/4

Layer 4 - Plaid Tidings DSP - 1/2 x 5 1/2 

1.  Layer 1 - Adhere to the card front.

2.  Layer 2 - Stamp girl Gnome from the Gnome for the Holidays stamp set then color in using stampin blends. (I used Mossy Meadow and Cherry Cobbler). 

    A.  Stamp four of the large leaves in Cherry Cobbler, 2 of the long leaves in Mossy Meadow and 2 of the second to the smallest leaves in Old Olive.  

    B.  Using the Stitched leaves dies cut and emboss all the leaves using the die cutting machine. 

    C.  Using snips fussy cut out the Gnome. 

    D.  Using Stampin Dimensionals place the first leave in the center of  Layer 1 towards the top edge.

        1.  Place the next leaf putting Stampin Dimensionals only on the outer leaves directly below the first leaf towards the bottom edge.

        2.  Next you will place the next two leaves to each side centering top and bottom.  You will need to trim the stems.  (Remember to only place Stampin Dimensionals on the outer leaves and use liquid glue to adhere the inner leaves.  

    E.  Now using liquid glue adhere the Old Olive leaves and Mossy Meadow leaves underneath the wreath you've just made as shown.  

    F.  Using Mini Glue Dots adhere the ribbon as shown.

    G.  Next using Liquid glue adhere the Gnome to the center of the wreath.

3.  Layer 3 - Stamp the sentiment from the Gnome for the Holiday's stamp set in Mossy Meadow ink then adhere to the card front just below the Gnome.

4.  Adhere three Pearl Basic Jewels to the card front as shown. 

5.  Layer 4 -  Adhere to the inside of the card to the bottom edge.  Then stamp the sentiment from the Gnome for the Holiday stamp set in Mossy Meadow.  

So there you go a Christmas Card with a fall stamp set.  It's good to think out side the box with your stamp sets so that you get the most use possible.  I hope you like it!  

If your looking for a Stampin Up® I'd love to be your demonstrator.  If you need supplies just click on any of the pictures below!
Product List


Friday, October 23, 2020

Love of Leaves "Hope"


 The Love of Leaves Bundle is a fun and unique bundle that make stunning cards!  The stitching on these stamped images is what makes this card so unique. I combined this with the Regals Designer Series Paper and another quick and easy card!  Your going to love the dies for this set.  There are five leaves in this set that you can stamp then cut and emboss.  All have the wonderful stitching that put a beautiful finish on the leaves.  

Here's a link for a video I did for this card and a Christmas Card using this set!

https://www.facebook.com/StampinJulieBrown/videos/836220307205766


Instructions:

Card Base and cuts (DSP = Designer Series Paper)

Card Base - Thick Whisper White - 5 1/2 x 8 1/2 scored at 4 1/4

Layer 1 - Regals DSP - 4 x 5 1/4

Layer 2 - Whisper White - 1 3/4 x 5 1/2

Layer 3 - Whisper White - 3 1/2 x 5 1/2

Layer 4 - Whisper White - 1/2 x 3 1/2 

1.  Layer 1 - Adhere to the front of the card base.

2.  Layer 2 - You will be using all the leaves except for the largest leaf for this strip.  As you stamp you will be coming in from the top edge and not stamping the entire leaf on the strip.  You will be stamping each of the leaves at least twice.  I used a different color for each of the leaves.  Here are the colors I used:  Old Olive, Rich Razzleberry, Cajun Craze and Crushed Curry.  

    A.  Then using the Stitched Leaves Dies and the die that has the stitched lines on it run this through the die cutting machine.  You will have to run it through twice as it will not be long enough to emboss the entire piece.  (Just line it up the second time where it stopped and run it through again.)

    B.  Adhere to the card front centering top and bottom.

3.  Layer 3 - Using Crushed Curry ink stamp two of the large leaves, then using Cajun Craze ink re-ink the stamp lightly (or stamp off) then stamp right over the top of the Crushed Curry leaves.  

       A.  Then using the Dies layer the cutting die over the stamped image then layer the embossing die on the inside and cut and emboss at the same time as you run it through the die cutting machine.  (Do this for each leaf)

    B.  Color the ribbon with the Cajun Craze stampin blend then tie onto the stem of each leaf.

    C.  Using Stampin Dimensionals adhere to Layer 2 as shown.  

4.  Layer 4 - Stamp the sentiment in Old Olive then adhere to the card front towards the bottom left corner keeping on Layer 1.  

5.  Adhere the 5 of the Artistry Blooms Adhesive-Backed Sequin to the upper right corner and lower right corner. 

6.  On the inside of the card stamp a few of the leaves in the lower right hand corner in various colors and then stamp the sentiment in Old Olive in the center. 


This card goes together pretty quick but it looks like you've spent a lot of time on it.  I hope you like it.  Please leave me a comment at the end of this blog to let me know what you think!

If you don't currently have a Stampin Up® demonstrator I'd love to be your demonstrator so if you need supplies just click on any of the pictures below and you'll be taken to my Stampin Up® store.  

Thanks for stopping by to check out my blog!  It's always nice to have someone drop in a visit with me!
Product List


Thursday, October 22, 2020

Dove of Hope "Sympathy" card

This set is so beautiful and unfortunately I was in need of a sympathy card so I thought I would use the Dove of Hope stamp set by Stampin UP®.  This card could be considered a simple stamping card as I did not use any dies for this card.  I did add some embellishments to add a delicate touch!  I wanted a delicate look so I used Mint Macaron as I've always liked this color.  I was very pleased with the finished card and am planning on making a few more to have on hand just in case I need another sympathy card.  Hopefully I won't but just in case I will have them on hand.  

Here's a video link for this card and a Christmas Card that I made with this set.


https://www.facebook.com/819342075094869/videos/1548706392002574

Instructions:

Card Base and Cuts:

Card Base - Basic Gray - 5 1/2 x 8 1/2 scored at 4 1/4

Layer 1 - Whisper White - 4 x 5 1/4

Layer 2 - Whisper White - 4 x 5 1/4

1.  Layer 1 - Using Mint Macaron ink stamp two branches coming in from the right hand side about half way down the sheet.  

    A.  Then stamp the dove image carrying the branch in the upper right hand corner.

    B.  Stamp the sentiment "Thinking of you with all my heart" from the Peaceful Moments stamp set in the lower left corner. 

    C.  Then adhere to the card front.

    D.  Color 5 of the Basic Pearl with the Dark Mint Macaron Stampin Blend then adhere to the card front as shown. 

2.  Layer 2 - Using Mint Macaron ink stamp the sentiment "With Deepest Sympathy" from the Peaceful Moments stamp set onto the center of the sheet and the Dove in the lower right hand corner then adhere to the inside of the card. 


I'd love to hear from you on what you think of this card.  Please leave me a comment at the end of this blog!  Also if you'd like to know when I post a new card just add you email to the right and you will be notified each time I post a new card!

Need supplies to make this card just click on any of the pictures below!
Product List


Wednesday, October 21, 2020

Dove of Hope "Peace"

What a beautiful Stamp Set!  Although I love all the fun Christmas cards at Christmas time I am especially attracted to those that celebrate the Savior.  This stamp set does just that and I really enjoyed creating this card and thinking of the birth of Christ.  It goes together pretty quick so that is another huge plus for this card!  I hope you like this card!  I'd love to hear what you think so don't forget to leave me a comment at the end of this blog!

Here is the video link to this card and a sympathy card that I did with this set!  In the video the sympathy card if first so make sure to watch the whole video!

https://www.facebook.com/819342075094869/videos/1548706392002574

Instructions:

Card Base and cuts

Card base - Real Red - 5 1/2 x 8 1/2 scored at 4 1/4

Layer 1 - Tis the Season DSP - 4 x 5 1/4 

Layer 2 - Basic Black - 2 1/4 x 5 1/4 

Layer 3 - Gold Foil - 3 1/2 x 4 1/2 

Layer 4 - Whisper White - 4 x 5 1/4 

Layer 5 - Whisper White - 1 x 3 1/2 

Layer 6 - Basic Black - 4 1/8 x 5 3/8 

Layer 7 - Whisper White - 4 x 5 1/4 

1.  Layer 1 - Wrap ribbon around top edge of Layer 1 about 5/8" from top. Then adhere to the card front.

2.  Layer 2 - Using the Ornate Layers Die cut out a label then adhere to the card front about 3/8" from bottom edge of Layer 1. 

3.  Layer 3 - Using the Detailed Dove Dies cut out 2 solid wings and a solid tail and the small branch. Set aside.

4.  Layer 4 - Using the Detailed Dove Dies cut out 2 detailed wings and the dove's body. Next: Glue the Detailed wings onto the Solid Gold foil wings.  Adhere the solid Gold tail to the Dove's body.  Adhere one wing to the back of the Dove's body then adhere the Dove's body to Layer 2 centering.   Using Stampin Dimensionals adhere the other wing onto the front of the Dove's body spreading the wings as shown.  Last adhere the gold branch just below the beak of the Dove. 

5.  Layer 5 -  Using the rectangle dies cut out a stitched rectangle then stamp with the Sentiment using Black Memento ink.  Using Stampin Dimensionals adhere straddling over the ribbon in the upper right corner of the card front. 

6.  Layer 6 - Adhere to the inside of the card.

7.  Layer 7 - Stamp the dove image in the lower right corner in Crumb Cake ink.  Then stamp the sentiment in Black memento ink onto the center.  Once this is done adhere to layer 6 in the inside of the card. 

8.  Add Three metallic pearls to the card front.  Two on the sentiment label between the words and one on the eye of the dove. 


Below is a list of all the supplies I used to make this card!  If you need any supplies just click on any of the pictures below! 
Product List