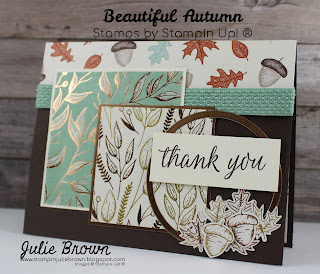
I will be doing a video soon on how to make this card so make sure to check out my Facebook page and make sure to click follow so you will be updated any time I do a live video!
https://www.facebook.com/819342075094869/videos/328554618585885
Project Instructions:
Cuts and Card Base. DSP = Designer Series Paper
Card Base: Early Espresso - 5 1/2 x 8 1/2 scored at 4 1/4
Layer 1 - Gilded Autumn DSP - 1 1/2 x 5 1/2
Layer 2 - Very Vanilla - 3 x 3
Layer 3 - Gilded Autumn DSP - 2 7/8 x 2 7/8
Layer 4 - Bronze Brushed Metallic Card Stock - 2 1/2 x 2 1/2
Layer 5 - Gilded Autumn DSP - 2 3/8 x 2 3/8
Layer 6 - Bronze Brushed Metallic Card Stock - 3 x 3
Layer 7 - Gilded Autumn DSP - 6 x 12
Layer 8 - Very Vanilla - 1 x 2 1/2
Layer 9 - Very Vanilla - 4 x 5 1/4
1. Layer 1 - Wrap ribbon around the bottom edge then adhere to the card front flush with the top edge.
2. Layer 2 - Adhere Layer 3 to this layer then adhere them both to the card front about 3/8" from left edge and 5/8" from top edge.
3. Layer 4 - Adhere Layer 5 to this layer then adhere them both to the card front over lapping layers 2 & 3. It should be about 1 1/2" from left edge, 3/8" from bottom edge and 1 3/8" from top edge.
4. Layer 6 - Adhere an adhesive sheet to the back then using the layering circle dies cut out a circle frame. (Note: this is done by layering a smaller circle die inside one of the larger dies to form a frame.) Then adhere to the card front.
5. Layer 7 - Using the Autumn Punch Pack, punch out several of the acorn and leaf images making sure to get some of each color. Then adhere a few to the bottom of the circle frame. (Note: I popped up the top acorn)
6. Layer 8 - Stamp the sentiment in Early Espresso ink then using stampin dimensionals adhere it as shown.
7. Layer 9 - Stamp some leaves in Mint Macaron and Cajun Craze in along the right side of this sheet. (Note to get the 2 tone look I stamped the detail stamp image first then I inked up the sold image stamped off onto a piece of paper then stamped over the detailed image.) Then stamp the sentiment onto the center of the sheet in Early Espresso ink. Adhere to the inside of the card.


Beautiful autumn thank you card!
ReplyDeleteThanks Theresa so glad you like it!
DeleteBeautiful autumn patterns and colours Julie! Thanks for being part of my International Highlights this month! All the best with the voting.
ReplyDeleteI love being a part of this I'm so glad you do this to help me use that creative side of my brain! Glad you like the colors
DeleteSuch a lovely card Julie the layout is stunning and the way you've cut your circle out is amazing. The falling leaves stamped inside the card is a very nice finishing touch x Natalie
ReplyDeleteSo glad you like it!
DeleteYour card is designed so beautiful with the Autumn Paper!
ReplyDeleteEveryone would love to see this in their mailbox!
Thank you so much!
DeleteLovely card, fab colours and great layout :) it really gives a lovely autumnal feel :) good luck with the voting :)
ReplyDeleteThank you Anne!
ReplyDelete