Wednesday, June 16, 2021

Bling and Hats Off by Stampin Up®

So glad you dropped by today!  Do you have ladies or girls in your life that wear hats all the time?  I do! 

 When I initially saw the Hats Off bundle I thought of all the masculine cards I could make with this set and I went to work creating cards.

Then I saw a hat at my daughters house that she wears frequently that was all jazzed up and I got the inspiration to do this card!

I chose to do it using our purple families as I have several of my current friends and customers that are in love with purple.  So this card is for all the purple lovers out there!

I also used the new Spiral Dye Stamp to create the design on the hat!

I hope you enjoy this card and please leave me a comment below!  I love to hear from all of you!

Oh and don't forget to add your email to the right under the "Follow Me" section to be notified when I post a new card to my blog!

Card cuts - Instructions and Supply List -

Card Cuts - DSP = Designer Series Paper

Card Base - Thick Basic White - 5 1/2 x 8 1/2 scored at 4 1/4

Layer 1 - Hand-Penned DSP - 4 x 5 1/4

Layer 2 - Highland Heather - 3 1/2 x 4

Layer 3 - Basic White - 3 x 4 (Hat)

Layer 4 - Basic White - 1 x 5 1/4

Layer 5 - Highland Heather - 4 1/8 x 5 3/8 (Inside)

Layer 6 - Basic White - 4 x 5 1/4 (Inside)

Instructions:

1. Layer 1 - Adhere to front of card base.

2. Layer 2 - Adhere to Layer 1 1/8" from top and right edges.

3. Layer 3 - Using the Hat Builder Dies cut out the large hat.

  • Then using the Spiral Dye Stamp, Stamp first in Gorgeous Grape ink, then turn hat 180 degrees and stamp again using Highland Heather ink.
  • you should have enough of the white leftover to now stamp the "Life is Great" stamp, using Highland Heather ink then cut out with the Hat Builder Dies as well. 
  • Adhere this to the hat as shown.
  • Set hat aside until you have stamped and adhered Layer 4.
4. Layer 4 - Stamp sentiment using Highland Heather ink towards the left side then adhere to the card front about 3/4" from bottom edge. 

5. To adhere the hat I usually run my finger along the brim to help it curve.  Then I add liquid glue to the top and put one dimensional underneath the lower part of the brim to help give it some dimension.

6. Now take some Basic Rhinestone jewels and adhere as shown. 

7.  Layer 5 - Adhere to the inside of the card.

8.  Layer 6 - Mask off sheet except for the lower right hand corner then stamp the Sprial Dye just as you did on the hat. 
  • Stamp the sentiment using Highland Heather ink.
  • Adhere to Layer 5 on the inside of the card.

Supply list: I would love to be your Stampin Up® demonstrator.  If you'd like to purchase any of the products I used to make this card just click on the picture below and you will be redirected to my online store
Product List


Tuesday, June 15, 2021

Hand Penned quick and easy "Get Well Card"

Welcome to my blog today!  Today I've created a Get Well card using the Hand-Penned Suite by Stampin Up®.

This suite includes the Hand-Penned Petals Bundle (Stamp set and Dies), Hand-Penned Designer Series Paper and Genial Gems.

The Hand-Penned Petals stamp set is a two-step stamping set.  What's unique about this set is that the second stamp image is a water color image and does not fit exactly into the first stamped image.  That's what gives it the water color look.  For those of us that that struggle with two-step stamping this set is perfect for you!  You don't have to be perfect to make this card look great!

For this card I added in the Through it Together stamp set, Pale Papaya ribbon, Garden Green and Pale Papaya Cardstock. 

To be updated each time I add a card to this blog just add your email to the right under the "Follow Me" section. 


Also don't forget to sign up for my newsletter which is full of helpful hints, specials and class information. 


Below you will find the Card cuts, Instructions and Supply List. 

 Card Cuts - DSP = Designer Series Paper

Card Base - Pale Papaya - 5 1/2 x 8 1/2 scored at 4 1/4

Layer 1 - Hand-Penned DSP - 2 1/2 x 5 1/2

Layer 2 - Garden Green - 1/2 x 4 1/2

Layer 3 - Basic White - 2 3/4 x 3 1/2

Layer 4 - Basic White - 4 x 5 1/4 

Instructions: 

Note - You may want to read through instructions so that you can do all stamping and die cutting before assembling card.

1. Layer 1 - Adhere to the card front 3/8" from left edge. 

2. Layer 2 - Adhere to Layer 1/2" from left edge.

3. Layer 3 - Using the Hand-Penned stamp set, stamp the large flower as shown in Black Memento Ink.

  • Next using Pale Papaya Ink and the solid flower images stamp the inside of the flowers.
  • Using Garden Green ink and the solid leaf images stamp the inside of the leaves.
  • (Remember they will not fit perfectly that is how it is suppose to look)
  • Adhere to the card front 3/8" from top edge and 1/4" from left edge of Layer 2.
4. Using Black Memento Ink, stamp the sentiment in the lower right corner of the card front as shown.
5. Layer 4 - Using the same stamp as Layer 3, stamp the image in the lower right hand corner in Black Memento Ink.
  • Stamp the flowers and leaves just as you did in Step 3. 
6. Using the Through it Together stamp set and Black Memento ink stamp the sentiment as shown.
  • Adhere to the inside of the card. 

Supply List: I would love to be your Stampin Up® demonstrator if you would like to purchase supplies for this card just click on the pictures below and you will be directed to my online Stampin Up® store. Note- You will notice both the suite and the individual components for the suite.  I have included both so that you can purchase the suite if you wish or the individual components.  If there is a bundle I do not list those separately as you do get a 10% discount for purchase bundles together.  


Monday, June 14, 2021

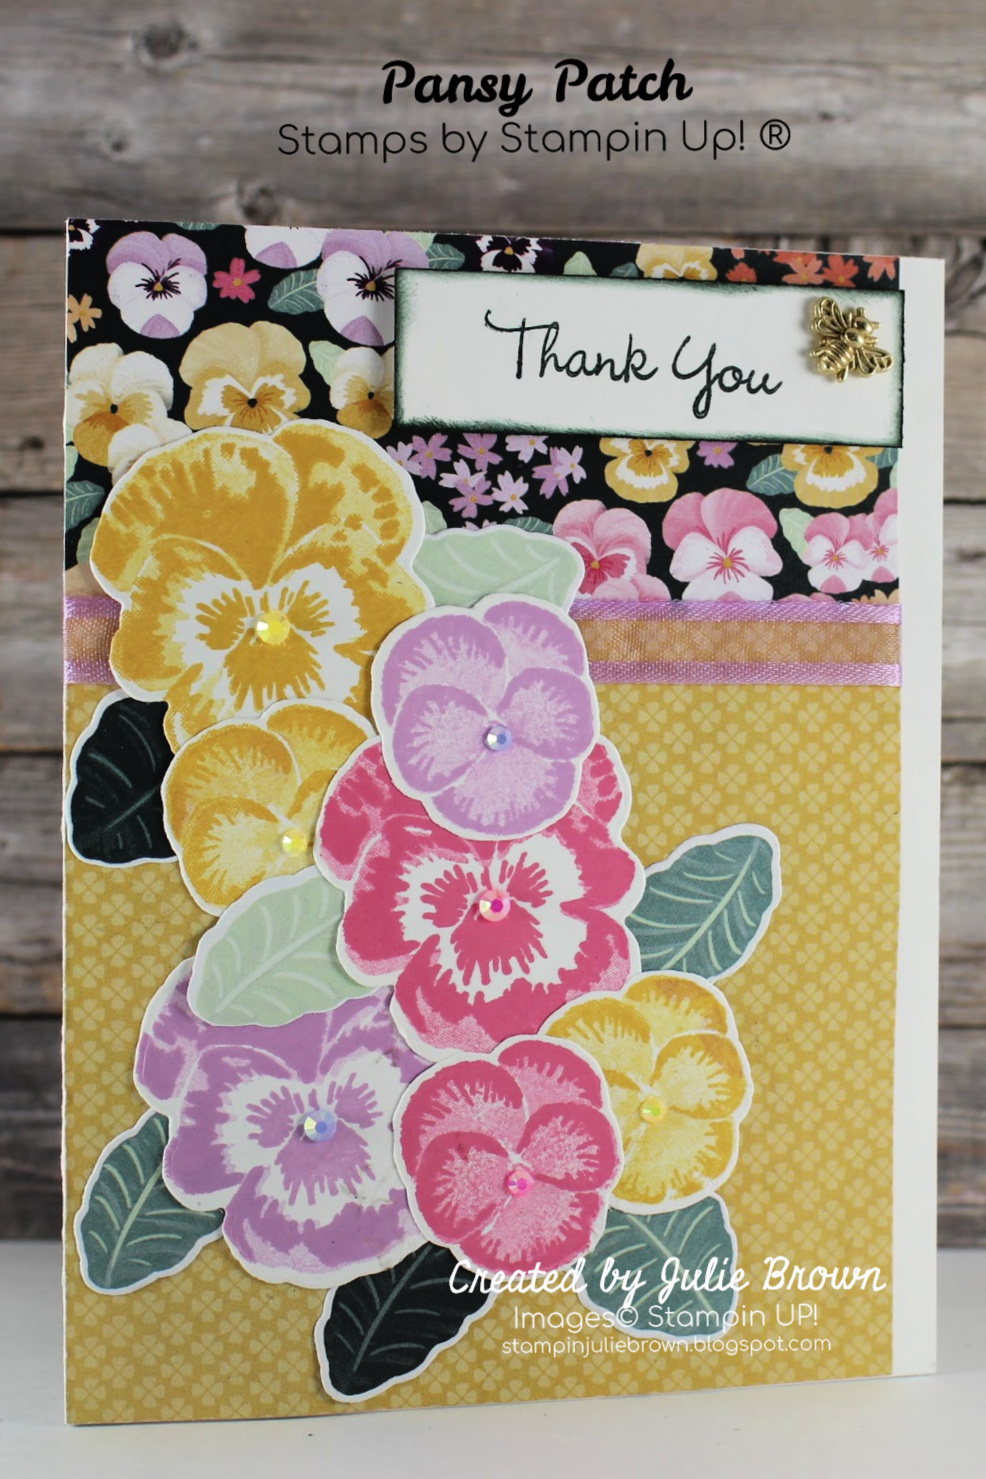
Pansy Petals Demonstrator Training Program Blog Hop June 2021


Welcome to our Demonstrator Training Blog Hop!  This one is so much fun!  We have demonstrators from around the world participating in this Hop each month and your going to love all the cards!

If you have never done a blog hop before just scroll down to the list and click on the name after mine!  Continue this on each blog until you get back here!

I hope you enjoy my card today!  I used the Pansy Patch  Bundle and  Pansy Petals Suite by Stampin Up®

Our Theme was Thank You.  One of my favorite themes as I always am in need of a Thank You card for all those in my life that do so many amazing things!

Hope you enjoy this card!

You will find the card cuts and supply list below the list of names for the Blog Hop! 

Blog Hop List:  


Don't forget to leave me a comment!

Card Cuts - DSP = Designer Series Paper

Card Base - Basic White - 5 1/2 x 8 1/2 scored at 4 1/4

Layer 1 - Pansy Petals DSP - 1 3/4 x 4

Layer 2 - Pansy Petals DSP - 4 x 4

Layer 3 - Basic White  - (2) 4 x 5 1/4 (Pansies)

Layer 4 - Pansy Petals DSP - 3 3/4 x 4 (leaves)

Layer 5 - Pansy Petals DSP - 1/2 x 4 1/4 

Supplies: I would love to be your Stampin Up® demonstrator if you would like to purchase supplies for this card just click on the pictures below and you will be directed to my online Stampin Up® store. Note- You will notice both the suite and the individual components for the suite.  I have included both so that you can purchase the suite if you wish or the individual components.  If there is a bundle I do not list those separately as you do get a 10% discount for purchasing bundles together.  Bundle = Stamp set/Die or punch

Product List: 


Wednesday, June 9, 2021

Touching Father's Day Card with Plentiful Plants by Stampin Up®

So glad you popped in today!  While I was designing cards with the Bloom Where Your Planted Suite.  I got the idea for this card! I have several pictures of my husband with our daughters and grandchildren in this pose! So I wanted to create a card that brought out those special moments!

As I stated above I used the Bloom Where Your Planted Suite by Stampin Up®. This Suite includes, Plentiful Plants Bundle (stamps set and dies), Bloom Where You're Planted Designer Series Paper, and Paper Lattice (which I did not use on this card) I did do another card with this suite using this.

Cardstock that coordinates with this suite is: Cajun Craze, Cinnamon Cider, Just Jade, Garden Green, Evening Evergreen and Gray Granite

I also brought in the "A Good Man" stamp set.  One of the things I love doing is mixing and matching my other stamp sets with new suites. 

Below are the Card cuts, Instructions and Supply List.

Don't forget if you don't follow my blog, please add your email to the right under the "Follow Me" section. 

Card Cuts - DSP = Designer Series Paper

Card Base - Soft Succulent - 5 1/2 x 8 1/2 scored at 4 1/4

Layer 1 - Bloom Where You're Planted DSP - 4 x 5 1/4

Layer 2 - Bloom Where You're Planted DSP - (plants cut out of paper)

Layer 3 - Soft Succulent - 1 1/4 x 2

Layer 4 - White - 1 x 1 3/4

Layer 5 - White - 4 x 5 1/4

Instructions: Note - You may want to read through instructions so that you can do all stamping and die cutting before assembling card.

1. Layer 1 - Using Black Memento ink, Stamp the Image from the "A Good Man" stamp set.

  • Color in using Stampin Blends, I used Light Evening Evergreen, Light Just Jade, Dark Crumb Cake, Light Basic Black, Light Cinnamon Cider, Dark Cajun Craze
  • Adhere Layer 1 to card front.

2. Layer 2 - Fussy cut out two of the plants from the DSP.

  • Adhere to card front on either side of the stamped image.
3. Layer 3 - Set aside until you finish Layer 4.
4. Layer 4 - Using Black Memento Ink stamp the sentiment.
  • Then adhere to Layer 3.
  • Adhere both to the card front as shown using Stampin Dimensionals to pop it up!
5. Layer 5 - Using Black Memento Ink stamp the sentiment as shown.
  • Using Garden Green stamp the leaf image in the lower right hand corner.
  • Adhere to the inside of the card. 

Supply List: Note- You will notice both the suite and the individual components for the suite.  I have included both so that you can purchase the suite if you wish or the individual components.  If there is a bundle I do not list those separately as you do get a 10% discount for purchase bundles together.  I would love to be your Stampin Up® demonstrator if you would like to purchase supplies for this card just click on the pictures below and you will be directed to my online Stampin Up® store. 

I would love to hear from you, so please take the time to leave me a comment about this card!


Product List