Thursday, January 7, 2021

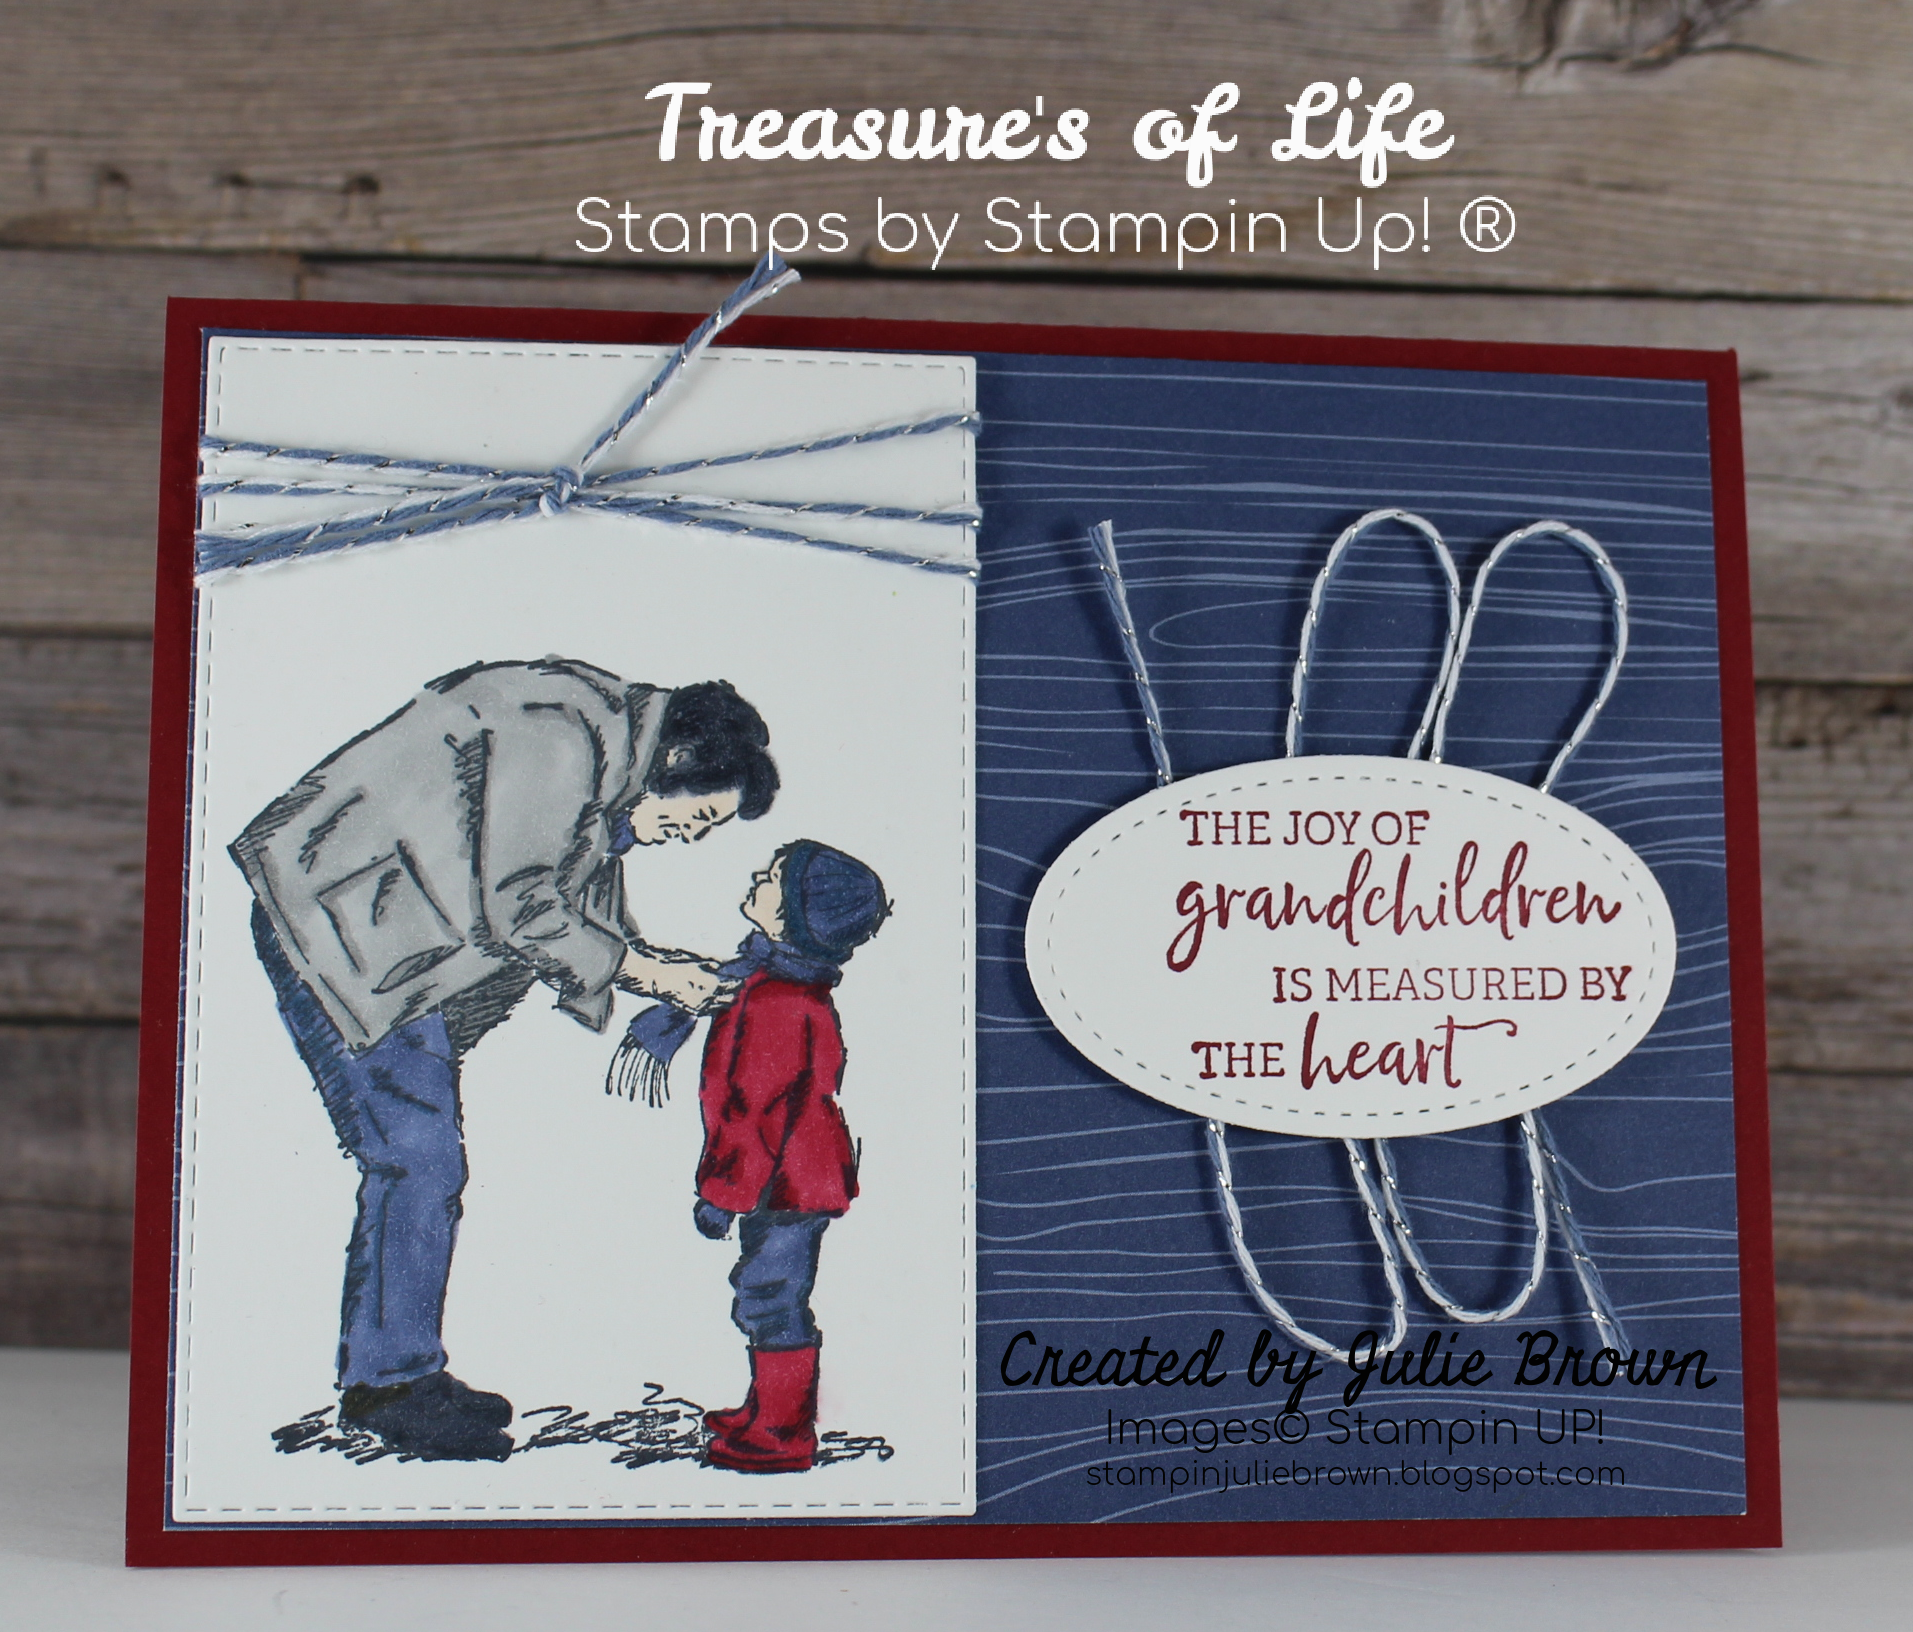
Treasures of Life "Grandpa"

Oh how I love this stamp set!  "Treasures of Life" stamp set.  My grandchildren are my joy in life!  So many wonderful moments come to mind when I see this set.  I cherish every moment I get to spend with them!  Making this card actually brought tears to my eyes as I thought of a moment like this that my husband and grandson just recently shared.  You know the stamp set is special when you feel such strong emotions when you start to create with it.  I hope you enjoy this card!  Please leave me a comment below and let me know what you think!  


Don't forget to follow me!  Just add your email to the right and you will be notified each time I add a new card to my blog!


Here's the step by step instructions:

Card Base: Cherry Cobbler – 5 ½ x 8 ½ scored at 4 ¼

Cardstock/DSP:  (DSP = Designer Series Paper)

Layer 1 – 2020-2022 In Color DSP – 4 x 5 ¼

Layer 2 –  Whisper White – 3 x 4 ½   

Layer 3 – Whisper White – 2 x 3

Layer 4 – Whisper White – 4 x 5 ¼

Layer 5 – 2020-2022 In Color DSP – ¾ x 5 ¼

 Instructions:

·         Layer 1 – Adhere to the card front.

·         Layer 2 – Using Black Memento ink stamp image.

·         Color with Stampin Blends – I used Smokey Slate, Misty Moonlight and Cherry Cobbler

·         Cut out with Stitched Rectangle Dies the 4th largest.

·         Wrap ribbon around top then adhere to the card front.

·         Layer 3 – Using Cherry Cobbler ink stamp the sentiment.

·         Cut out using the Stitched Shapes Dies and the third largest die.

·         Place ribbon as shown onto Layer 1

·         Then adhere this layer using stampin dimensionals over the ribbon.

·         Layer 4 – Stamp the sentiment in Cherry Cobbler on center of sheet then adhere to the inside of the card.

·         Layer 5 – Adhere to the bottom of Layer 4. 


      Don't forget to order any supplies you might need by clicking on any of the pictures below to be directed to my online store!
Product List


Wednesday, January 6, 2021

Hey Girlfriend "Time to Celebrate"

Welcome to my blog today!  So glad you are here!  This is my third card using the Hey Girlfriend stamp set.  I had to do a Birthday themed one.  For this card I used the masking technique using a post it note.  Those post it notes sure come in handy!  Who knew!  For the sentiments I used the Itty Bitty Birthday stamp set, it has so many options for birthday cards. The paper is from the Sale A Bration catalog and it is free with a $50 purchase.  Make sure to take a look at what choices you have in the Sale A Bration catalog. Just click on the link to the right on the catalog and it will take you to the online catalog!  Please don't forget to leave me a comment below and let me know what you think of this card!


Here are the step by step instructions: 


Card Base: Night of Navy – 5 ½ x 8 ½ scored at 4 ¼

Cardstock/DSP:  (DSP = Designer Series Paper)

Layer 1 – Paper Blooms DSP (155223) – 4 x 5 ¼

Layer 2 –  Night of Navy – 3 ¼ x 4 ¼  

Layer 3 – Whisper White – 4 x 5 ¼

Layer 4 – Night of Navy – 1 x 2

Layer 5 – Whisper White – 1 x 2

Layer 6 – Whisper White – 4 x 5 ¼


Instructions:

·         Layer 1 – Adhere to the card front.

·         Layer 2 – Adhere to Layer 1 centering on sheet.

·         Layer 3 – Using Black Memento Ink stamp the girl image.

·         Then stamp another image onto a post it note and cut it out keeping close to the lines

·         Place the post it note over the stamped girl image on Layer 3 then stamp the balloon image three times as shown.

·         Color in the Girl and balloons using stampin blends:  I used Rococo Rose, Seaside Spray, Soft Sea Foam, Night of Navy, Daffodil Delight and Petal Pink.

·         Using the Stitched So Sweetly Dies cut out with the largest rectangle die.

·         Wrap ribbon around bottom about ¾ from bottom edge.

·         Adhere to card front onto Layer 2 using stampin dimensionals

·         Layer 4 – Adhere to card front centering over the ribbon.

·         Layer 5 – Using the Itty Bitty Birthday stamp set, stamp sentiment in Night of Navy ink.

·         Using the Stitched So Sweetly Dies cut out with the smallest rectangle die.

·         Adhere to Layer 4.

·         Layer 6 – Using Night of Navy ink stamp the sentiment from the Itty Bitty Birthday stamp set. 

·         Stamp three balloons in the bottom right corner and color them with stampin blends.

·         Adhere to the inside of the card.   


      I would love to be your Stampin Up demonstrator if you don't already have one.  If you want to purchase any of the products I used to make this card just click on any of the pictures below and you will be directed to my online store! 

Supply list:  If you need any of the supplies to complete this card just click on any of the pictures and you will directed to my online store!  I would love to be your Stampin Up® demonstrator!
Product List


Tuesday, January 5, 2021

Hey Girlfriend "I love my besties"

Thanks for stopping by my blog today!  I'm so excited about the new products coming out in the new January - June 2021 Mini Catalog by Stampin Up®. I usually get so excited about the bundles first but the "Hey Girlfriend" stamp set jumped out at me!  We all have those special friends that we make in our lifetime.  Those that have been by our sides through the good times and the bad!  The ones we have been able to laugh with and lean on!  For some of us these are friendships that started when we were in grade school and have been with us through raising our children.  So many wonderful memories!  So here is a stamp set that can put into words all those great times spent with our friends. 

Don't forget to add your email to the right so you can be notified when I post new cards and your going to want to be watching as I add card from the new catalog!


Cut and Card Base Instructions: (DSP = Designer Series Paper)

Card Base - Thick Whisper White - 5 1/2 x 8 1/2 scored at 4 1/4
Layer 1 - Whisper White - 4 x 5 1/4
Layer 2 - Oh So Ombre DSP - 2 x 5 1/4
Layer 3 - Blackberry Bliss - 4 x 5 1/4
Layer 4 - Oh So Ombre - 1/2 x 4 1/4 

Instructions:
  1. Layer 1 - Using the Layering Circle Dies cut out three circles using the second to the smallest straight edge die as shown.  
    • Then using the Brushed Blooms stamp set and the small dots image stamp several times around the top circle in Rococo Rose ink and around the lower circle in Blackberry Bliss ink.
    • Lay onto card front and trace circles onto card front. 
    • Make sure to keep in mind the frames that will be placed on this layer.  Then stamp the sentiment in Black Memento ink as shown.  Color in heart with the  Rococo Rose Stamp N Write marker.
    • Stamp the top of each of the girl images as shown in Black Memento ink inside the circles that you just traced onto the card front.  
    • Using Stamp N Write Markers color in the girls.  I used Rococo Rose, Blackberry Bliss, Bermuda Bay, Basic Gray, Soft Suede, So Saffron, Pacific Point and Petal Pink.  
      2. Layer 2 - Lay down onto Layer 1 (do not adhere) on the right hand side then turn over and trace              the circle.  Then cut out the circle using the same die as in step 1. Adhere to the Layer 1 on the                right hand side lining up circles. Then adhere both layers to card front using Stampin                              Dimensionals.

     3.  Layer 3 - Using the same straight edged die and the third of the smallest scalloped die cut out                  three of the scalloped frames.  Adhere one to each circle on Layer 1. 
  • Apply a pearl to each frame as shown. (note: one is missing in photo) 

    4.  Stamp sentiment in Black memento ink on the inside of the card.

    5.  Layer 4 - Adhere to the inside of the card. 


This card goes together pretty quick!  The Designer Series Paper that I used is part of the Sale A Bration which means it free with a $50 purchase from Jan - Feb of 2021!  That's why Sale A Bration is one of my favorite times.  Anytime we get free items it's great!   Don't forget to leave me a comment below and let me know what you think!

List of supplies - If you need any of them you can click on the picture and you will be directed to my online store!
Product List


Monday, January 4, 2021

Hey Girlfriend "Thanks"

So glad you are stopping by my blog today!  Every so often I enter a contest to see how well my creations are doing!  This month I am in a line up with several other demonstrators across the world!  Click on the link below and you will be taken to the site and you can vote on the cards you like best! 

https://l.facebook.com/l.php?u=https%3A%2F%2Fbit.ly%2FKyliesInternationalHighlightsJanuary2021VoteForMeHere%3Ffbclid%3DIwAR2RCfV5pjZglyX34g7gzL96Q5HENnAXhIpIaShsfU3KwsZm0DJjXnFCUck&h=AT2S7taFg9cCKXQ16t4tI1lqx05T84Us6NtaywVJ5SKs1owcQOow2hBJL4BngyAjbBnYE3PshmI0r0VXnQxKOe-t7Ptp3jAKwZynACJr5-tRnr0jo6CV2kpCcmYr0EFmOtAXWjosB0qnmrPdJw&__tn__=-UK-R&c[0]=AT1EO4i8hVMk_vVwoSf9jmaBjopcUQXPIIQuxpgnc71Z2ZiVh2yeavgkcryqQRHuw1_Gbdtgste1PGKZEecTdIEdvZLpLLTDPiyZsT63_d8yPbXqQwM1tML1lDL6lhzw74o9Fe_-pM8y6A


For my card I used the new "Hey Girlfriend" stamp set and I took the sentiment from the new "Hydrangea Haven" stamp set.  We all have those special friends in our lives and I was so excited when I saw this set because it's perfect for sending cards to our besties!  I also used the Ornate Layers Dies to give it a more elegant look.  The Designer Series Paper is from the Sale A Bration catalog!  This paper is free with a $50 or more order.  It's so pretty!  Hope you like this card and don't forget to leave me a comment below!

Here's the step by step instructions for putting this together!


Card Base: Thick Whisper White – 5 ½ x 8 ½ scored at 4 ¼

Cardstock/DSP:

Layer 1 – Flower & Field DSP (155223) – 4 x 5 ¼

Layer 2 – Whisper White – 4 x 5 ¼

Layer 3 – Just Jade – 4 x 5 ¼

Layer 4 – Whisper White – 3 ¾ x 5


Instructions:

·         Layer 1 – Adhere to the card front.

·         Layer 2 – Stamp the girl image in Black Memento ink onto the center of the sheet.  

  •             Then color in with Stampin Blends.  I used Just Jade, Soft Suede, Petal Pink and Light Basic Black

·         Using the Hydrangea Haven Stamps set stamp the “Thank You” sentiment as shown.

·         Using the Ornate Layers Dies cut out a large label.

·         Using the Bumble Bee In color ribbon place as shown onto Layer 1.

·         Adhere Layer 2 to card front using stamping dimensionals as shown.

·         Color three Rhinestones with Just Jade Stampin Blend then adhere to Layer 2 as shown.  

·         Layer 3 – Adhere to the inside of the card


·         Layer 4 – Using the Hey Girlfriend stamp set:

·         Stamp sentiment in the center of sheet.

·         Stamp girl image in the lower right hand corner.

·         Color in image with Stampin Blends

·         Adhere to Layer 3 inside of the card.  


Don't forget to leave me a comment below and let me know what you think!

Here is the supply list of items I used if you need any of them just click on the photo's and you will be redirected to my online store!

Product List