
For this card I used the rainbow die then stamped onto the negative pieces to give this card a fun look!
I also used the Sunshine and Rainbow DSP which is one of the free products you can get with a minimum purchase during the Jan-Feb 2022 Sale A Bration.
Don't forget to sign up for my newsletter so you can get the lastest news and card ideas!
Below you will find the card cuts, instructions, supply list and a video link for this card and two other card.
Card Base - Thick Basic White - 5 1/2 x 8 1/2 scored at 4 1/4
Card stock - Misty Moonlight - 4 x 5 1/4
Basic White - 3 3/4 x 5 & 3 x 4
DSP - Sunshine & Rainbow - 4 x 5 1/4
Specialty Paper - In Color Shimmer Vellum - 3 3/8 x 4 5/8
Instructions:
1. Adhere DSP to the card front.
2. Placing Stampin Dimensionals in the center of the Shimmer Vellum adhere to the card front at an angle.
3. Using the Brilliant Rainbow Dies:
* Cut out the Rainbow die placing it about 1/2" from top edge and centering. (Make sure to keep the rainbow strips that cut out with this)
*Using the four small stamp images (raindrops,hearts,lines & dots) stamp the rainbow strips like so:
*Smallest strip - Raindrops in Granny Apple Green ink
*Next Strip - Hearts in So Saffron ink
*Next Strip - Lines in Pool Party ink
*Next Strip - Dots in Misty Moonlight ink
*Using Misty Moonlight ink stamp the sentiment below the rainbow cutout!
*Adhere the 3 x 4 basic white piece with the rainbow cutout onto the card front placing it at an angle as shown making sure to cover the dimensionals under the shimmer vellum. (Note: make sure to add liquid glue to the rainbow cut out to hold down the rainbow)
*Apply foam strips to the backs of all the stamped rainbow strips then place back into place on the rainbow cutout!
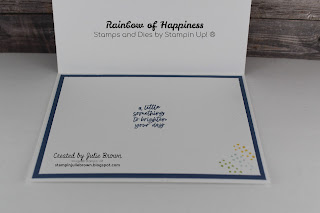
4. For the inside of the card:
*Adhere the Misty Moonlight piece in the inside of the card.
*On the Basic White piece stamp the sentiment in Misty Moonlight ink centering.
*In the lower right hand corner stamp the dot images three times (once in Pool Party, once in Granny Apple Green and once in So Saffron)
*Adhere to the Misty Moonlight matte on the inside of the card.
Supplies: (Note if you need any supplies just click on any of the pictures below to go to my online store)
Product List")
 Designer Series Paper")


Video Link: https://www.youtube.com/watch?v=WrpDvNDvWoM
No comments:
Post a Comment