Tuesday, January 25, 2022

Gumball Greetings Valentines Card!

I don't know about you but I love shaker cards!  We always think of giving them to children but I have several adult friends that enjoy these cards!

I wanted to design a card for valentines that didn't have the usually hearts and such. (Although I love those as well).  This Bundle was perfect.

Stampin Up® comes out with suites that include Stamp set bundles, Designer Series Paper, Ribbon, etc but this bundle did not have any paper to go with it!  So what to do?  Design your own paper!

Now this bundle did come with some fun coordinating items such as the Frosted Beads Assortment and the Gumball Machine Shaker Domes so I used those to create this fun card!


Card cuts:
Card Base: Thick Basic White - 5 1/2 x 8 1/2 scored at 4 1/4
Card Stock: Basic White - (2) 3 3/4 x 5, 1 x 1
Gorgeous Grape - (2) 4 x 5 1/4, 3 1/2 x 4 1/2 
Specialty Paper - Silver Foil - 2 x 2

Instructions:
1. Using the Stitched Rectangle Dies:
* Cut out the center of one of the 4 x 5 1/4 pieces.  Adhere the frame that is left to the front of the card base.

* Set aside the inside piece which should be about 3 1/2 x 4 1/2 

2.  To create your background it's best to use a stamparatus if you have if not you can do it by hand.

*Using the following inks - Gorgeous Grape, Daffodil Delight, Granny Apple Green, Bermuda Bay and Polished Pink.

 * Next using the long border stamp either (set it up on the stamparatus or apply to a long block)  Then stamp image onto the top of one of the 3 3/4 x 5 Basic White piece in Daffodil Delight.

*If using the stamparatus move down a hinge then reink with next color and stamp again or move down 3/4" and stamp in next color. The order I used is Daffodil Delight -Gorgeous Grape- Bermuda Bay - Granny Apple Green - Polished Pink. 

*Then using the gumball images stamp in Daffodil delight in lower open section.  Move up to next section use the Licorice image and stamp in Gorgeous Grape, Next use the Heart stamp and stamp in next section using Polished Pink - Move to next section and using Granny Apple Green stamp the gumball images again - last move up to last section using Bermuda Bay and stamp the Licorice image again in this section.  

3. Using the Gumball Machine Dies:

* Using the Gumball die cut out an opening in the Basic white piece that you just stamped on about 1 1/2" from top edge and centering. 

* Take the 3 1/2 x 4 1/2 Gorgeous Grape piece and apply some Adhesive strips to the back, cut out the Gumball bottom, Detailed Gumball bottom piece, Gumball top and the two strip dies for the top and bottom edge of the Gumball top.  Leave enough space to cut a strip that will be 1/2 x 3 1/2. 

*Now build your pieces for the Gumball machine together and set aside.

* Using the Silver Foil cut out the embossed machine front and the handle.  Set aside.

* Using the 1 x 1 Basic White piece stamp the small 5c coin image in Gorgeous Grape then use the die to cut it out.  Set aside.

4.  Using the Gorgeous Grape strip that you cut previously rub with an embossing buddy, stamp sentiment in Versa Mark ink, cover with White Embossing Powder, flick off excess powder then heat up with heat tool.  

Assembly:

1.  Pull off the front tape from the Gumball Machine Shaker Dome and fit it into the Stamped Basic White piece from the back side.  

* Apply adhesive to the back of the paper then pull off the tape from the back of the Gumball Machine Shaker Dome.  (This is where you need to be careful)

 * First place the bottom only to the card front.  Hold the rest away from the card front.  Then add the Frosted Beads to the dome.  Turn the card away from you and lay face down onto your table push down and attach it all together.  

2. Turn to front side then add the Gumball Machine bottom below the dome and the Gumball top above the dome.

* Using a Round black brad attach the silver handle to the Silver Gumball machine front. 

* Using a mini glue dot slide the coin into the slot on the Silver machine front. 

*Using Mini Stampin Dimensionals adhere the Silver piece to the front just above the flap that opens.  

3.  Adhere the sentiment label above the Gumball machine as shown. 

4.  Inside of card:

* Using Bermuda Bay ink stamp the sentiment in the center of the other 3 3/4 x 5 Basic White piece and the small gumball machine in the lower right hand corner. 

*Adhere to the Gorgeous Grape matte.

*Adhere both to the inside of the card. 

I hope you enjoy this card I would love to hear from you so don't forget to leave me a comment below!

Here is a link to a video for this card: https://www.youtube.com/watch?v=qfOSwnWYLss

Supply List: (if you'd like to purchase any of the products I used for this card you can click on any of the pictures below to be taken to my online store)

Product List


Monday, January 24, 2022

Sweet Conversations by Stampin Up® All occasion card!

Here's another card using the Sweet Conversations Bundle!  There is also a suite of products that goes along with this set!  My last card used the Designer Series paper and this one is using the Gingham Embossing Folder!  I love embossing folders they are an easy way to add dimension and interest to your cards!

I also brought in the Ornate Frames Dies as they coordinate really well with the dies from this bundle!

This card goes together really quick!  I wanted to use sentiments that you could add, a happy birthday, congratulations, Thanks etc to and make it into a card for any occasion so I brought in the Special Moments stamp set (Sale A Bration set).  

For those of you who don't know what Sale A Bration is, it's a special sales program by Stampin Up® where you can qualify for free product with minimum purchases during a specific time frame.  Right now Sale A Bration is going on from Jan-Feb of 2022.

Here are the card cuts, instructions and supply list for this card!  Don't forget to sign up for my newsletter so you can keep up with all I am doing!

Card Cuts -
Card Base - Real Red - 5 1/2 x 8 1/2 scored at 4 1/4
Card stock - Real Red - 1 1/4 x 2
Basic Black - 4 x 5 1/4, 2 x 2 1/4
Basic White - 3 3/4 x 5, 4 x 5 1/4, 2 x 2

Instructions:
1. Using the 3 3/4 x 5 Basic White piece:
       * Using Real Red ink stamp several hearts as shown making sure to 2nd generation stamp some of them so that they are lighter in color.

      * Using Black Memento ink stamp the large dotted image stamping off to lighten up the color over a couple of the hearts as shown.

*Then run through the Gingham Embossing Folder

*Adhere to the Basic Black matte, then add them both to the card front.

2. Next using the Sweet Heart Dies:

* Cut out the label from the Basic Black piece.  Set aside

*With the 1 1/4 x 2 Real Red piece cut out a small and tiny heart.  Set Aside.

3. Using the Ornate Frames Dies:

* Using the larger of the straight edged labels, Cut out a label from the 2 x 2 basic white piece.

* Using Black Memento ink stamp the sentiment onto label.

* Then adhere to the center of the Basic Black Label.

* Run linen thread through the hole in the top and tie a bow.

4. Adhere these to the card front using stampin dimensionals.

5. Add die cut read hearts to the label as shown.  The larger one will need a dimensional on the part that is off the label.

6. Using the Dark Real Red stampin blend color in the Rhinestones then add to the card front as desired.

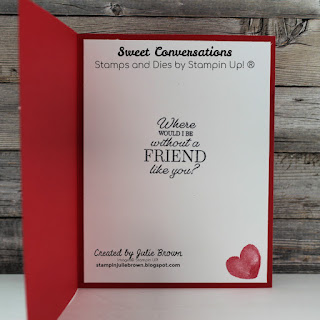
7. For the inside of the card:

* Using the Special Moments Stamp set and Black Memento ink,stamp the sentiment onto the 4 x 5 1/4 Basic White piece centering. 

* Using Real Red ink stamp one heart in the bottom right hand corner.

* Adhere to the inside of the card. 

Supply list: (If you'd like to order just click on any of the pictures below)

Product List


Saturday, January 22, 2022

Banner Valentines card with Sweet Conversations Bundle

Welcome to my blog!  It's been awhile since I have blogged.  We had a devastating loss in our family right before Christmas and it has taken me some time to get my heart back and create!  I guess I never realized that your heart is part of what helps you to create!  Thanks to everyone who has been so patient with me as I am going through this healing process!  

Today I wanted to create a Valentine card!   I used the new Sweet Conversations Bundle from the new Jan-June 2022 Mini catalog!

This die set is amazing and has so many wonderful images that can be created with the dies.


I also did some fuzzy cutting with some of the Sweet Talk Designer Series Paper.

Below are the cards cuts and instructions along with a list of supplies I used to create this card!  Hope you enjoy!

Card cuts:

Card Base - Real Red - 5 1/2 x 8 1/2 scored at 4 1/4

Card Stock: Real Red - (2) 4 1/4 x 5 1/2. scrap for hearts

Highland Heather - 4 1/4 x 4 1/2

Basic White - 4 1/4 x 5 1/2, 4 x 5 1/4, 1 1/2 x 1 1/2

Designer Series Paper (DSP) - Sweet Talk - 4 x 5 1/4, 1 1/2 x 3 (candy cut outs)

Instructions:

1. Adhere 4 x 5 1/4 DSP to the card front.

2. Using the Stitched Rectangle Dies:

* Cut out the largest Rectangle from the 4 1/4 x 5 1/2 Real Red Piece (taking card to center die as you will be using the outside frame not the inside piece)

*Then cut out the next size die down with the 4 1/4 x 5 1/2 Basic White piece. (again it's the frame you want so make sure you are centering die before cutting)

*Adhere the Real Red frame to the White frame keeping outside edges flush.

*Using Dimensionals add both frames to the card front again keeping outside edges flush.

3. Using the Sweet Heart Dies:  

* With the Highland Heather piece cut out one envelope plus two of the longest heart borders. (Make sure to save the little hearts)

* With the other Real Read piece cut out 2 of the envelope dies making sure to position them so that you can cut out a 1/2 x 3 1/4 strip from one end.

*Using your paper trimmer cut out the strip.

*Rub an embossing buddy over the strip then ink up the sentiment with versa mark ink, cover with white embossing powder, shake of excess powder then heat up with heat tool.  Set aside.

* With the Real Red scrap cut out 4 of the tiny hearts. Set Aside 

4. On the 1 1/2 x 1 1/2 Basic White piece:

*Stamp the BFF heart in Highland Heather

*Then using the solid heart image, ink up with Real Red ink and stamp off onto a scrap piece of paper.  Then stamp over the BFF image. 

*Using the Sweet Heart Dies and the appropriate heart die cut out this image.  Set Aside.

5. Using the Sweet Talk DSP - fussy cut out 6 of the small candy images.  Set Aside.

Assembly:  

1. Gather your 2 heart borders:

* For the one to be used on the left side add a stampin dimensional behind the third heart over (DO NOT REMOVE THE BACKING), also add a dimensional on behind the last heart.

* For the one to be used on the right side add a stampin dimensonal behind the third heart in as you did on the left side. 

* Using Liquid glue and the border for the left side attach to the left side of the frame about 1 1/8" from top edge (Note you are still not sticking down the dimensionals you should still have the backing on them.)

* Do the same thing on the right side 

 * Using Liquid glue attached the heart in the center together over the dimensionals. 

(You will need to angle these borders just enough to fit the sentiment above but no so low that the envelopes will hang off the bottom you want the envelopes to be inside the frame)

Now you can remove the backings from the dimensionals this can be a little tricky I used my Take a Pick tool but if you don't have one you can use tweezers or a piercing tool.

2. Next burnish three of the edges on each of the envelopes.

*Fold together making sure to fold up the bottom edge last.  (I used liquid glue on the left and right sides at the bottom edge, and around the top curve the of bottom flap with a mini glue dot as well to help hold shut) MAKE SURE NOT TO GET ANY GLUE AT THE TOP OF THE ENVELOPES AS YOU WILL BE ADDING THE CANDY.

* Using Mini glue dots add the side candies to the 2 Real Red envelopes then whichever candy you want in the middle use a mini stampin dimensional to pop it up.

* For the Highland Heather envelope, using Mini glue dots add the BFF heart and one of  small red hearts as shown. 

* Add a purple heart to the top of the bottom fold on the Real Red envelopes and a Red heart to the Highland heather envelope as shown.

* Attach envelopes as shown adding Liquid glue to the top and a Dimensionals to the bottom.

3. Adhere the sentiment strip just above the heart borders and envelopes as shown.

4.  For the inside of the card:

*Stamp the sentiment in Real Red onto the center of the 4 x 5 1/4 basic white piece.

* Using Highland Heather ink stamp one "o" and 2 "x's" in the bottom right hand corner as shown.

*Adhere to the inside of the card.

Supplies used: (if you'd like to order just click on any of the links below)  I'd love to hear from you so leave me a comment below and let me know what you think of this card!

Product List