Saturday, June 27, 2020

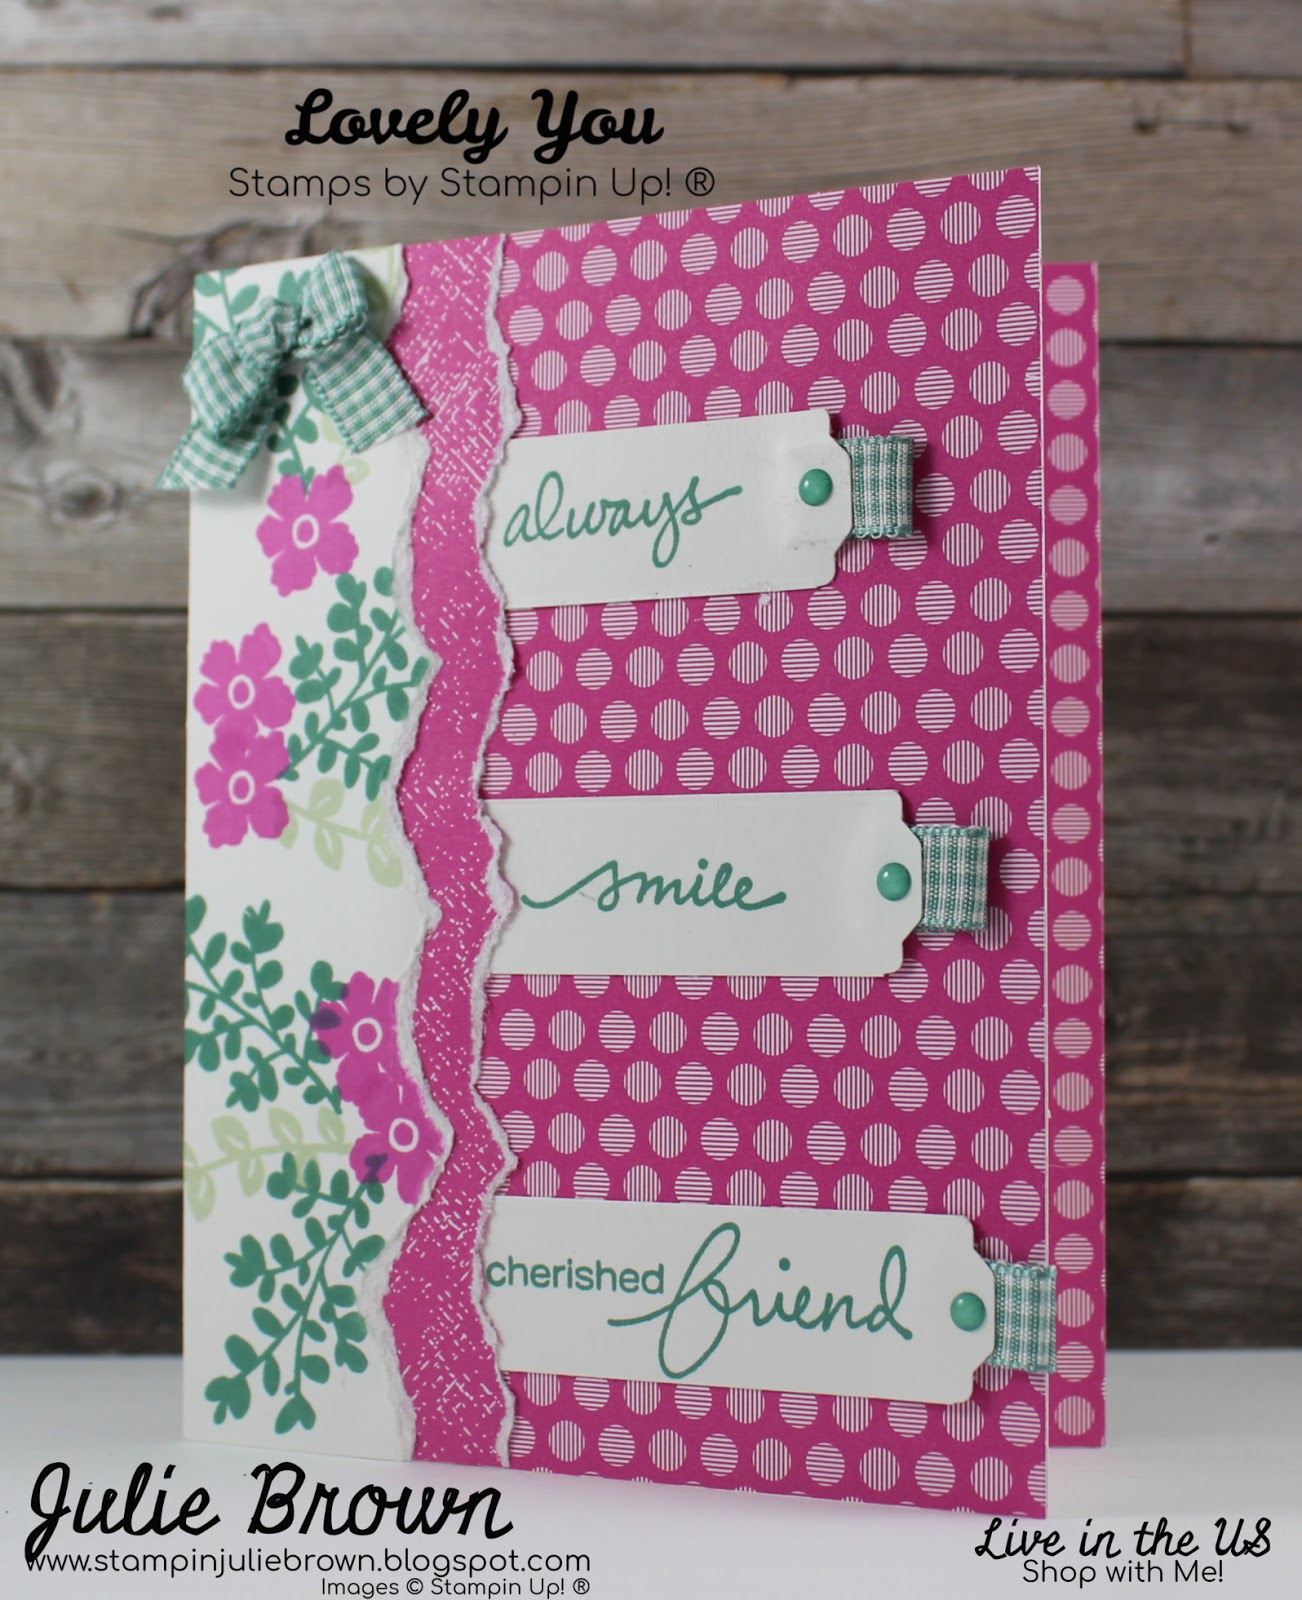
Lovely You Bundle - Friendship!

This was a fun card to design and make. I used the Lovely You Bundle from Stampin Up!® I haven't used the tearing technique in a long time but loved the way it looked on this card! Sometimes we need to fall back on some of the techniques that we haven't used in awhile to help us create some great cards!  I combined this with the Just Jade Ribbon from the Flowers for Every Season Suite and the 2020-2022 In Color Enamel Dots from Stampin Up!® and it finished it off just perfect.  If you haven't done the tear technique in a while for have never done it try it out.  I think you will love the outcome!

Project Recipe:

  1. Cut instructions:

    Card Base: Thick Whisper White - 5 1/2 x 8 1/2 scored at 4 1/4
    Layer 1 - 2020-2022 In Color DSP (Magenta Madness Polka dot) - 3 x 5 1/2
    Layer 2 - Whipser White - (3) 3/4 x 3
    Layer 3 - 2020-2022 In Color DSP (Magenta Madness back side of Polka Dot) - 2 x 5 1/2
    Layer 4 - Whisper White - 2 x 5 1/2
    Layer 5 - 2020-2022 In Color DSP (Magenta Madness Polka Dot) 1/2 x 5 1/2
  2. Layer 1 - Adhere to the card front flush to the top, bottom and right edges.
  3. Layer 2 - Stamp sentiments on strips in Just Jade Ink as shown. Then punch one side with the Lovely Labels Pick A punch.

                                                                                                                                                                                                                                        4.  Once you have punched one side then you will want to cut the other side down to the following:
Top: 2 1/4"
Middle: 2 1/2"
Bottom: 2 3/4"  

5. Adhere a small piece of folded ribbon to the end of strips on punched side.

6. Adhere to layer 1 as follows:
Top strip: about 5/8 from top edge and 1/2 from right side.
Middle strip: about 1" below Top strip and 1/4 inch from right side
Bottom Strip: about 1" below middle strip and flush to the right side of card front.

7.Layer 3 - Tear right side then adhere to the card front layering over the left edge of the sentiment strips.


8. Layer 4 - Using Just Jade, Mint Macaron and Magenta Madness ink pads stamp leaves and flowers onto this sheet.


9. Carefully tear right edge then adhere to the card front making sure you can still see Layer 3.


10. Tie a bow from the Just Jade Gingham ribbon and adhere to the top left corner of card front. 

11. Layer 5 - Adhere to the inside of the card flush with the top, bottom and right edges. 

12. Stamp sentiment and flourishes in Just Jade ink centering on inside of card.


13. To finish it off add one of the Just Jade enamel Dots to the end of each of the sentiment strips. 

Please leave a comment below and let me know what you think of this card!

Here is a link to a video for this card and 2 others using this bundle! The video did stop while filming the third card but you can find the continuation of that card on my facebook site Julie's Creative Stamping!


Don't forget to order your supplies to make this card!  Just click on the pictures below to order!

Product List


Thursday, June 25, 2020

Lovely You Simple Stamping!


Isometimes forget how beautiful a card can be using a stamp set, ink and some card stock. Here's a great example of how simple stamping can produce a great card!  The Lovely You stamp set by Stampin Up!® is perfect for simple stamping as it has so many pretty images plus so many sentiments. There are so many ways to use these images to create a beautiful stamped card!  This is also a very quick card to put together another great bonus for simple stamping! 

Tuesday, June 23, 2020

Pampered Pets Press N Seal Technique - Sympathy Card!

One of my favorite techniques is the Press N Seal technique.  It makes arranging several pieces on a card so easy.  Especially if you are wanting to pop some of the pieces up.  This card is made using the Pampered Pets Bundle and product from the Playful Pets Suite from Stampin Up!  I needed a sympathy card for a friend of mine who lost a beloved cat.  I thought this card would be perfect as all the cats show a different personality found in cats.  Hopefully it will uplift and bring back some fun memories of her wonderful cat!


Project Recipe:

  1. Cuts for card: DSP - Designer Series Paper
    Card Base: Cinnamon Cider 5 1/2 x 8 1/2 scored at 4 1/4
    Layer 1 - Basic Black - 4 x 5 1/4
    Layer 2 - Playful Pets DSP 12 x 12 sheet
    Layer 3 - Real Red - 1 x 2 1/2
    Layer 4 - Whisper White - 4 x 5 1/4
  2. Layer 1 - Cut out individual cats and ball of yarns from Layer 2 the Playful Pets Designer Series Paper.

3. Now lay out the cats and yarn onto layer 1 as desired. You will want to have some of them partially off the sheet.


4. Take a piece of Press N Seal and carefully cover the cats and yarn trying not to move any of them. Press down to assure the pieces stick to the Press N Seal. 


5. Turn sheet over and using a pencil draw lines along edge of Layer 1. 


6. Press down then carefully pull the Press N Seal sheet up making sure the cats and yarn stay stuck to the press n seal.


7. Add Stampin Dimensionals to the backs of the cats being careful to pay attention to the part of the cats that will not be on the sheet. Add Liquid glue to the yarn pieces.


8. Remove the backing from the Stampin Dimensionals then carefully lay layer 1 onto the Press N Seal sheet back,  lining up with the drawn lines. Turn over then Press down making sure to press the yarn pieces down as well.


9. Carefully remove the Press N Seal sheet from the cats and yarn.


10. Trim off any parts of the cats that are overlapping.


11. Turn over then adhere to the front of the card.


12. Using Black Memento Ink stamp the sentiment onto Layer 3. Fussy cut out and adhere to the          card front as shown. 

13. Layer 4 - Adhere one of the cut out cats to the bottom right hand corner. 


14. Stamp the sentiment in the center of sheet then adhere to the inside of the card.

Please don't forget to leave a comment below and let me know what you think!

To purchase any supplies just click on one of the pictures below to go to my store!

Product List


Saturday, June 20, 2020

Pampered Pets - Birthday Card!

The Playful Pets Suites by Stampin Up!® is a great suite if you have animal lovers in your friends and family circle! Here's a fun Birthday card that is really easy to make!  Animals can be such good companions and offer unconditional love.  Just the other day I was downstairs designing cards and the power went out! It was pitch black!  It melted my heart that immediately my boy Percy came running down the stairs to make sure I was Ok.  He stayed next to me until I made it safely upstairs.  What a good boy!  I hope you fall in love with this suite like I did.  It's so much fun with all the different dogs.  Of course I will need to add spots to one of the dogs to look like my boy! 


Project Recipe:

  1. Cuts instructions for card:
    DSP = Designer Series Paper
    Card Base: Soft Suede - 5 1/2 x 8 1/2 scored at 4 1/4
    Layer 1 - Playful Pets (DSP) - 2 1/2 x 5 1/4
    Layer 2 - Basic Black - 1 1/4 x 3
    Layer 3 - Real Red - 1 x 3
    Layer 4 - Whisper White - 1 x 3
    Layer 5 - Whisper White - 2 1/2 x 5 1/2
    Layer 6 - Whisper White - 4 x 5 1/4
  2. Layer 1 - Wrap ribbon around bottom edge keeping bottom and side edges flush. Adhere to card front at the top about 1/8" from top edge.
  3. Layer 2 - Using the Detailed Trio punch round all the corners then adhere to the card front centering on Layer 1 placing at an angle.
  4. Using Mini Glue dots adhere the black and white trim in a circle pattern as shown.
  5. Layer 3 - Using the Lovely Labels Pick a Punch, punch both ends then adhere to layer 2 with Stampin Dimensionals.
  6. Layer 4 - Stamp sentiment in Black Memento ink then fussy cut around sentiment and adhere to Layer 3.
  7. Layer 5 - Stamp both dogs images (front and back) , Sentiment and dog bowl all in Black Memento ink. Color Dogs and Dog Bowl with Stampin Blends. Dog - Basic Black combo and Real Red (collars) , Dog Bowl - Dark Real Red
  8. Cut out Dog images with the Pet Dies. Fussy cut the Sentiment and Dog Bowl.
  9. Adhere the Dog images to the card front on the left and right sides on the bottom using Stampin Dimensionals
  10. Adhere the dog bowl directly between both Dog images towards the bottom.
  11. Using Mini Stampin Dimensionals adhere the sentiment about 1/2" above the dog bowl centering.
  12. Layer 6 - Stamp the head from the Dog image in the lower right hand corner. Color in with Stampin Dimensionals.
  13. Layer 6 - Stamp the sentiment in Real Red Ink then adhere to the inside of the card.

Don't forget to leave me a comment below!  Let me know about your fur baby!

Just click on the pictures below to order your supplies.  Note: If you want the entire suite just click on any of the pictures below and enter item# 154136. 

Product List