Thursday, June 2, 2022

He's All That Gate Fold Card

 Welcome to my blog today!  Since it's June and it's time to think about Father's Day I thought I would post a few masculine cards that could be used for any occasion for the men in you life!  Today I'm showing you a Gate Fold card made with products from the He's the Man suite by Stampin Up!®


If you like fun fold cards you'll love this one!  I love the way it opens and closes at the circles!

Below you will find the card cuts, instructions and supply list!  Before you scroll down don't forget to sign up for my newsletter so you can be up to date on all my new creations and all the Stampin Up® news!


Card cuts: DSP = Designer Series Paper

Card Base - Soft Succulent - 5 1/2 x 8 1/2 scored at 2 1/8 on each end

He's All That DSP = (4) 1 7/8 x 5 1/4 ***2 each different patterns

Card Stock - Basic White = 4 x 5 1/4

-Basic Black = (4) 2 x 5 3/8; 2 3/4 x 2 3/4

-Soft Succulent =  (2)3 x 3; 2 1/2 x 2 1/2

Instructions:

Make sure to burnish all scored edges of card base before starting.

Stamping:  1.  Using Crumb Cake ink stamp inside sentiment with truck onto the center of the 4 x 5 1/4 Basic White piece then stamp corner images in each corner.

Die Cutting: 2. Using the All That Dies- cut out the fancy circle from the 2 1/2  2 1/2 piece. Set aside.

3. Using the Stylish Dies and the 2nd and 3rd largest Circle Dies, cut out 2 of the frames from the 3 x 3 Soft Succulent pieces (Note: Very important that you cut them together by layering one piece over the other and run both together through the Die Cut machine- You will need to run it through back and forth a few times as it's cutting through 2 pieces.) Glue piece together lining up carefully.

4.  Then cut on stitched circle from the 2 3/4 x 2 3/4 Basic Black piece (3rd largest circle)

Assemble:  5.  Adhere the Basic Black mattes to front and back of panels.

6.  Then adhere DSP pieces onto the front and back of panels onto the Basic Black mattes.

7.  Adhere the Die cut circle from DSP die cuts "Lookin Sharp" onto the fancy Soft Succulent Circle.

8.  Adhere both to the stitched black circle.

9.  Adhere these to the front right panel being careful to only add adhesive where it will be touch the panel.

10. Next adhere soft succulent frames to the left front panel lining up with circle on right panel (again making sure to only put adhesive where it will be touching the left front panel only.)

11. Using Dimensionals add die cuts from the DSP die cut sheet to the card front as shown.

12.  Adhere the 4 1/8 x 5 3/8 Basic Black piece to the inside of the card.

13.  Then adhere the Basic White piece that you already stamped onto the Basic Black piece on the inside of the card.

14.  Apply Rustic Metallic Dots to the stars on the front panels.

Supply list:  (If you need to order any supplies just click on the pictures below and you will be directed to my online store)  Also please note that I am listing both the suite product number and the individual components to the suite that can be ordered separately.
Product List
He's The Man Suite Collection (English)
$68.00
He's All That Bundle (English)
$45.00
Stylish Shapes Dies
$30.00
He's The Man 12" X 12" (30.5 X 30.5 Cm) Specialty Designer Series Paper
$15.00
Soft Succulent 8 1/2" X 11" Cardstock
$9.25
Basic White 8 1/2" X 11" Cardstock
$10.25
Basic Black 8-1/2" X 11" Cardstock
$9.25
Crumb Cake Classic Stampin' Pad
$8.00
Rustic Metallic Adhesive Backed Dots
$8.00
Mini Stampin' Dimensionals
$4.25
Multipurpose Liquid Glue
$4.00


Tuesday, May 24, 2022

Best Butterflies & Brick and Mortar


Welcome to my blog!  I hope you like butterflies because this card come from a new suite by Stampin UP® called Butterfly Kisses!  Now the Designer Series Paper is very bright and makes you smile but I wanted to make a card for all my purple lovers out there!

I know its hard to see but I used the Brick & Mortar 3D embossing folder on the Basic White piece on the front of this card.  I could not get a good picture of it but in person it looks stunning!

Below you will find the card cuts, instructions, supply list and a link to a video I did for this card and one other using the brighter colors!  Enjoy!

Don't forget to sign up for my newsletter to keep updated on all my new card designs and Stampin Up® goodies!

Card cuts: Card Base = Fresh Freesia - 5 1/2 x 8 1/2 scored at 4 1/4

Card Stock = Basic White - (2) 4 x 5 1/4, 1 1/2 x 3
= Fresh Freesia - 3 x 5 1/2 & 1 1/8 x 5 1/4

Designer Series Paper (DSP) = Butterfly Kisses - 1 x 5 1/8 & 1/2 x 4

Instructions:

Die Cutting/Embossing:
1.  From the 3 x 5 1/2 Fresh Freesia piece cut the following at the same time: 
A.  Using the Build a Butterfly Dies - cut one large and one small detailed Butterfly.
B.  Using the Deckled Rectangle Dies - Cut the second to the smallest die

2.  From the 1 1/2 x 3 Basic White piece - Cut out the smallest Deckled Rectangle Die

3.  Run one of the 4 x 5 1/4 Basic White pieces through the Brick & Mortar 3D embossing Folder.

Stamping:

4. Using the Fresh Freesia ink do the following:
A.  Place the front sentiment onto a block then mask off the word "vibes" ink up with the ink pull off mask then stamp onto the Basic White Deckled piece as far to the top as you can fit it.
B.  Then mask off the words "Sending good" ink up with the ink pull off mask then stamp the word "vibes" as shown just below "Sending good" 

5.  On the other 4 x 5 1/4 Basic White piece stamp the inside sentiment as shown.


Assemble:

6.  Adhere the Brick & Mortar Basic White piece to the card front.

7.  Adhere the DSP strip to the 1 1/8 x 5 1/4 Fresh Freesia strip, then add both to the card front about 1/2" from left edge of Brick & Mortar piece and flush on the top and bottom.

8.  Using Mini Dimensionals down the back of the bodies on the Butterflies adhere them to the card front as shown. 

9.  Adhere the stamped Deckled Label to the Fresh Freesia Label then add both to the card front as shown. (Note: use dimensionals on the back of the right side and liquid glue on the back of the left side to keep it level)

10.  Apply Basic Pearls to the Butterflies on the card front. (Note: I used medium pearls for the large butterfly and small pearls for the small butterfly)

11.  Apply the Fun Flowers Resin Shapes to the sentiment label as shown. 

12.  Adhere the 1/2 x 4 DSP strip to the bottom of the stamped 4 x 5 1/4 Basic White piece then adhere both to the inside of the card as shown. 

All done!

Supply list:  (Note if you'd like to order any supplies just click on any of the pictures below to go to my online store)  I have listed all the individual products in the suites as well as the suite to simplify ordering!

Product List
Butterfly Kisses Suite Collection (English)
$67.50
Best Butterflies Bundle (English)
$47.50
Deckled Rectangles Dies
$30.00
Brick & Mortar 3D Embossing Folder
$10.00
Butterfly Kisses 6" X 6" (15.2 X 15.2 Cm) Designer Series Paper
$12.00
Fresh Freesia 8 1/2" X 11" Cardstock
$9.25
Basic White 8 1/2" X 11" Cardstock
$10.25
Fresh Freesia Classic Stampin' Pad
$8.00
Fun Flowers Resin Shapes
$8.00
Pearl Basic Jewels
$6.00
Mini Stampin' Dimensionals
$4.25
Multipurpose Liquid Glue
$4.00


Thursday, May 19, 2022

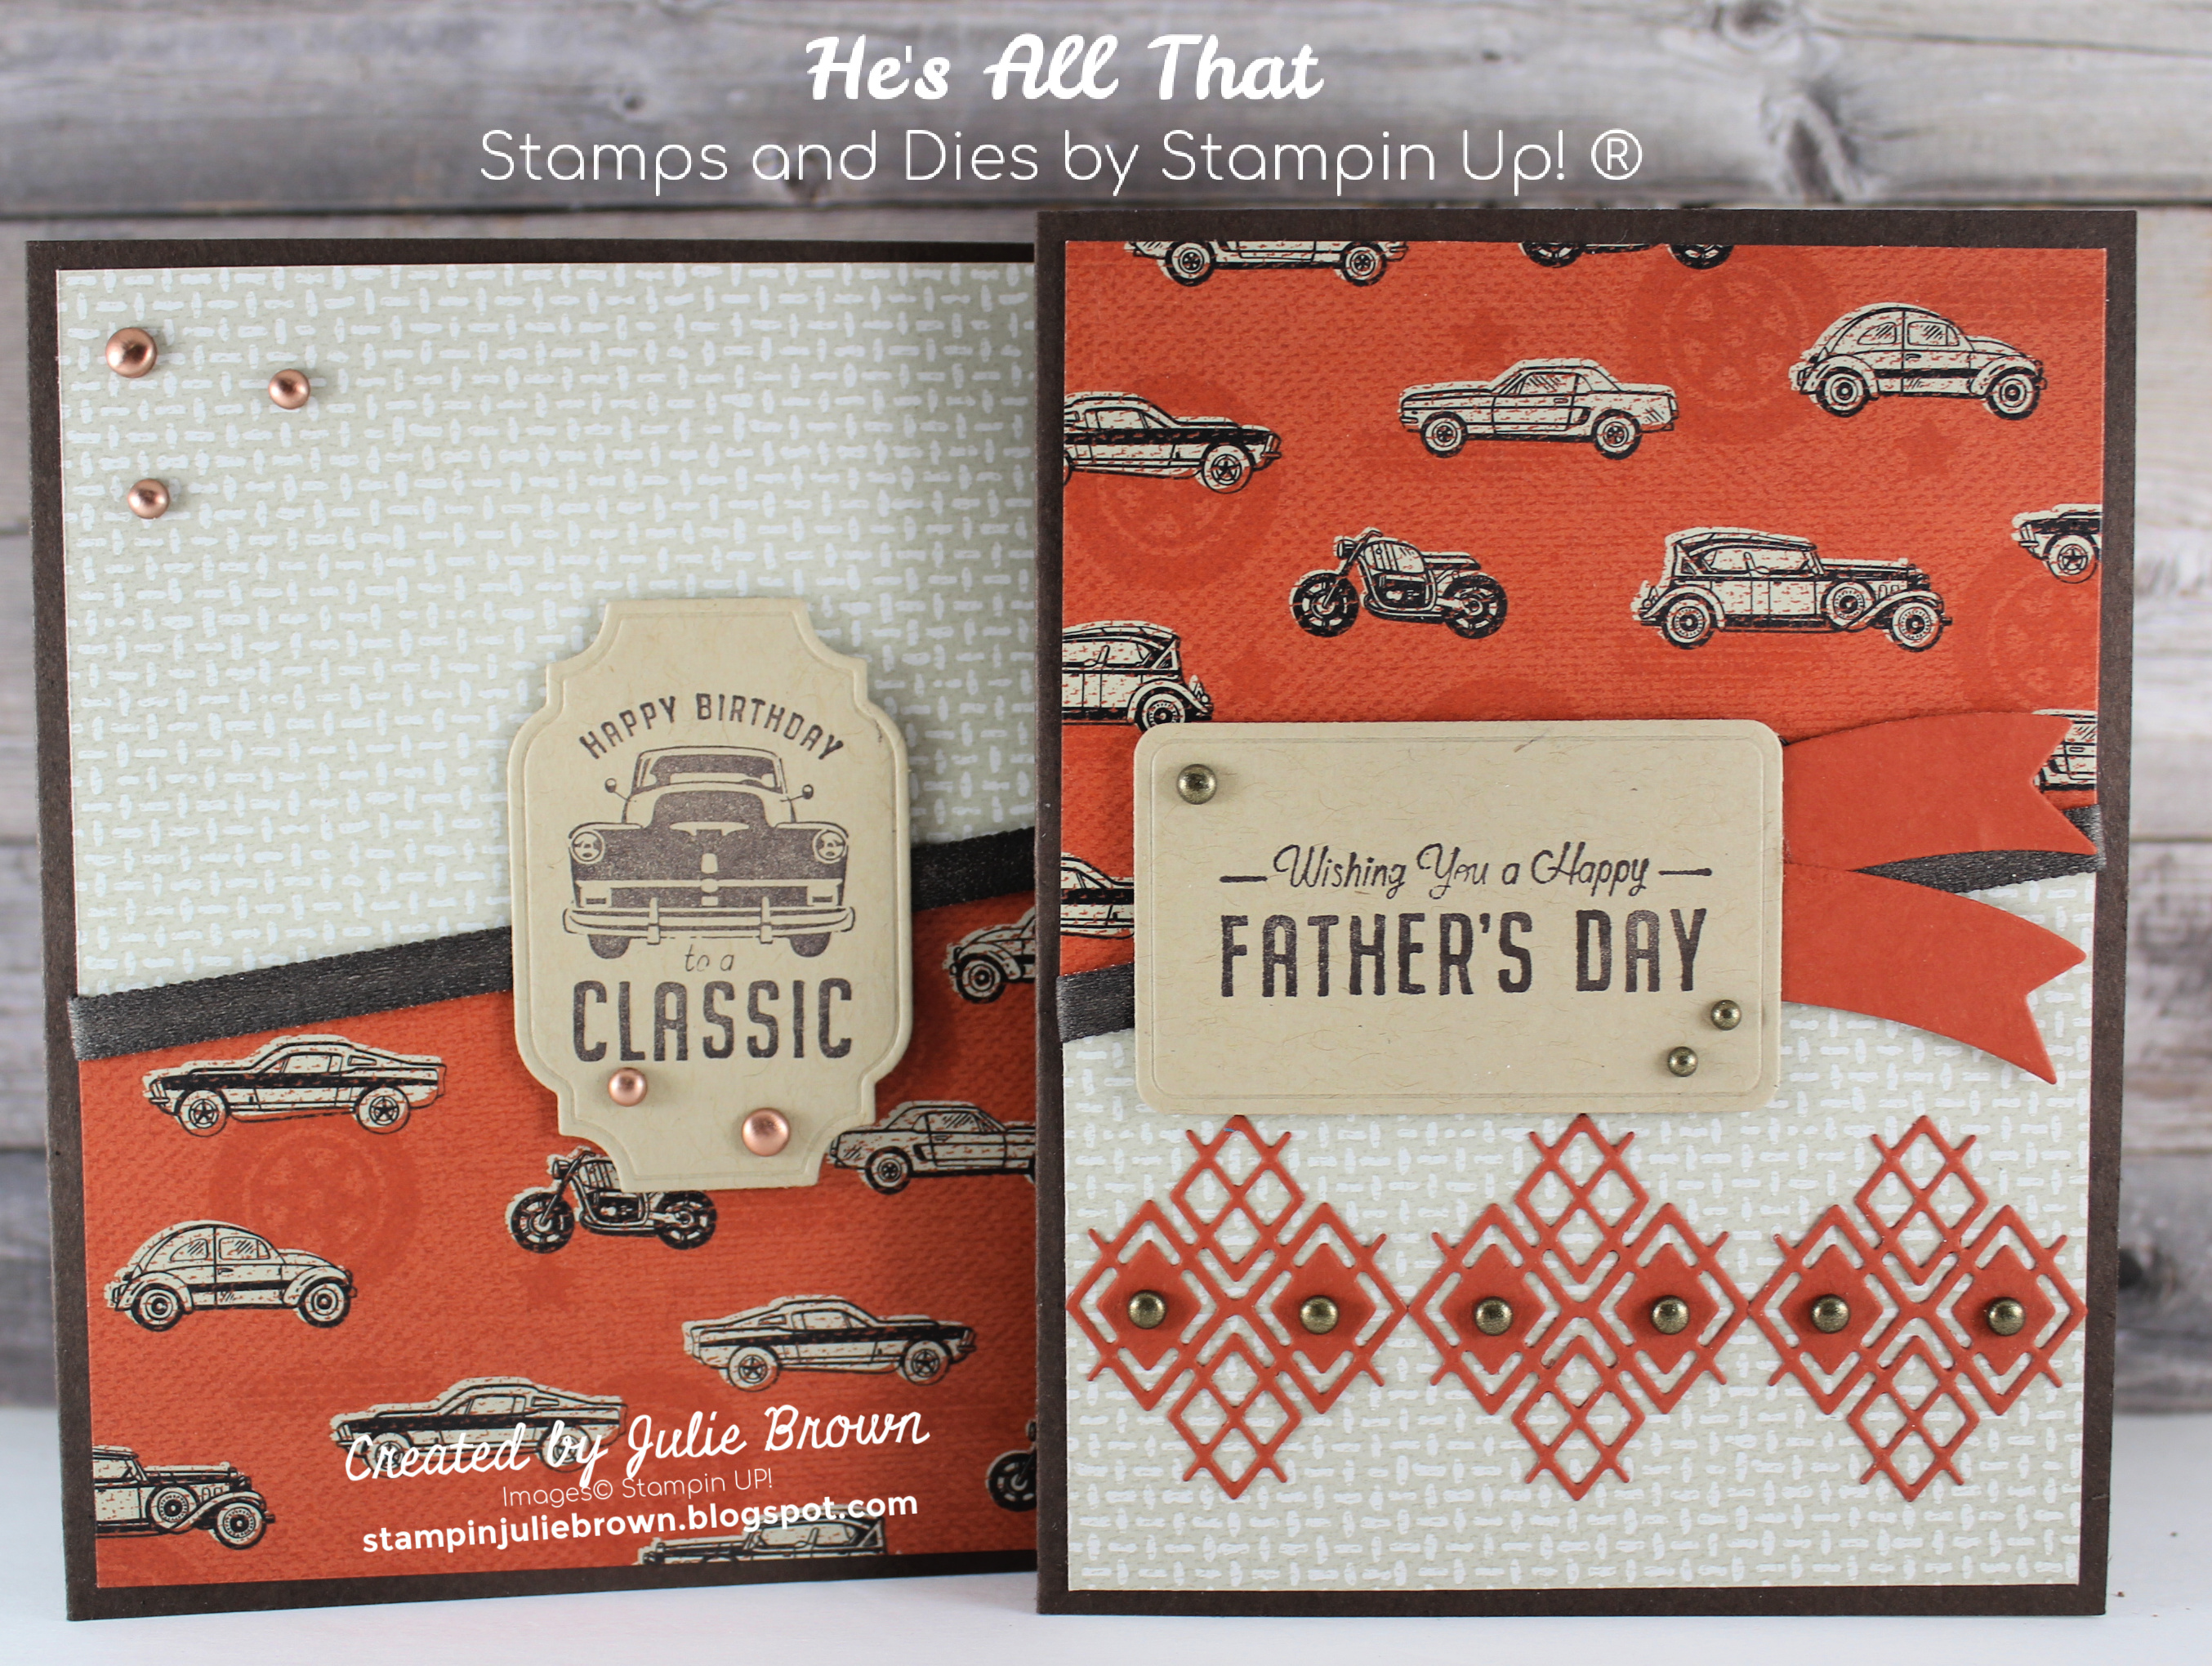
He's All That Split Level Masculine Cards


Thanks for spending some time with me today!  I'm always in need of masculine cards so I had to make up some cards with the He's The Man suite by Stampin Up!®.  Part of this suite includes the He's All That bundle and I had fun designing with the bundle along with the Designer Series Paper.

One unique thing about the Designer Series Paper is that it has 2 pages of die cuts included in it that make creating cards so quick and easy.  Watch for more cards on this blog designed with this suite.  The video link below shows these two cards but at the end I show off some other cards I designed with this suite.

Don't forget to sign up for my newsletter so you can get all the updated Stampin Up® info and my new card creations.  

So here we go below you will find the card cuts, instructions, supply list and a video link!

Card Cuts: DSP = Designer Series Paper
Card 1- on right in picture and Card 2 on left in picture

Card Base - Both - Early Espresso 5 1/2 x 8 1/2 scored at 4 1/4

DSP - He's the Man (2) 4 x 5 1/4 (note: when you cut these you will have what you need to make both cards!

Card stock - 
-Crumb Cake (Both) - 4 x 5 1/4; 2 x 3
- Cajun Craze (Card 1) - 3 x 4


Card 1


Card 2

Instructions:

Stamping-

1.  Using Early Espresso ink stamp the insides onto the 4 x 5 1/4 Crumb Cake piece as shown above for each card. 

2.  Card 1 - On the 2 x 3 Crumb Cake piece stamp the "Father's Day" sentiment in Early Espresso ink - 

3.  Card 2 - On the 2 x 3 Crumb Cake piece stamp the "Happy Birthday" sentiment in Early Espresso ink.

Die Cutting:

Using the All that Dies to the following:

4.  Cut out Front sentiments for both cards. (Note: see pictures above to see which die to use for which card)

5.  Card 1- Cut out the 2 banners and other design from the Cajun Craze piece. 

DSP Cutting:

6.  (Both Cards) - Using a pencil measure up from the bottom left side to 2 1/4 make a mark, then measure down from the right side to 2 1/4 and make a mark.  Then using a trimmer cut from one mark to the other mark.  (This will form an angle cut when cut correctly).  Do this for both pieces of the DSP.  Then match them together as shown above.

Assemble:

7.  (Both Cards) From the back side place DSP pieces together and secure them with scotch tape. (Note: place the tape about 1/2: from edge so that you can place adhesive on the edge to hold ribbon as shown in the video)

8.  (Both Cards) Turn over and wrap ribbon around both pieces cover where they meet.  

9.  (Both Cards) Adhere to card front. 

10.  Card 1 - Adhere the Cajun Craze detailed pieces to the bottom of the card front as shown.

10a.  Using Dimensionals adhere the sentiment as shown.

10b.  Using both Dimensionals and liquid glue place banners as shown. (Note: I used Liquid glue on the part that goes under the sentiment label and Mini Dimensionals on the part of the banner that does not touch the ribbon)

10c.  Apply Rustic Metallic Dots as desired. (Please see picture for this in the video I did not add them to the detailed dies on the bottom)

11.  Card 2 - Using Dimensionals adhere the sentiment label to the card front straddling the ribbon on towards the right side of card.  

11a.  Apply Brushed Metallic Dots to card as shown. (Note: these are different than the Rustic Dots) 

Supply List: (Note I have listed both the complete suite and the separate items in the suite and other items used) To order just click on any of the pictures below!
Product List
He's The Man Suite Collection (English)
$68.00
He's All That Bundle (English)
$45.00
He's The Man 12" X 12" (30.5 X 30.5 Cm) Specialty Designer Series Paper
$15.00
Early Espresso 8-1/2" X 11" Cardstock
$9.25
Crumb Cake 8-1/2" X 11" Cardstock
$9.25
Cajun Craze 8-1/2" X 11" Cardstock
$9.25
Early Espresso Classic Stampin' Pad
$8.00
Rustic Metallic Adhesive Backed Dots
$8.00
Brushed Metallic Adhesive Backed Dots
$9.00
Early Espresso 1/4" (6.4 Mm) Faux Suede Trim
$6.50


Wednesday, May 18, 2022

Home and Garden Father' Day


So glad you popped over today!  I'm getting ready for Father's day to make sure I have plenty of cards on hand.  It never fails that all my Grandkids call me at the last minute to see if I have a card they can give their Dads!  I do have a couple of them that come and make them for themselves.  We always have a great time!

For this card I used the Home & Garden Bundle by Stampin Up® along with some help from some regulars in my stash!

I actually taught this class this month for my in person card class and they loved it.  It takes a bit of prep work cutting out the pieces but it is well worth it!

Here are the card cuts, instructions and supply list:

Card cuts: DSP = Designer Series Paper

Card Base - Night of Navy - 5 1/2 x 6 3/4 scored at 4 1/4

Card stock - Basic White- 4 x 5 1/4 and 1 x 2 1/2
- Night of Navy - 1 1/2 x 4 1/4; 1/2 x 3 and 3/4 x 2 1/2
-Basic Gray - (2) 2 3/8 x 5 3/8
- Soft Suede- 4 x 5
-Mossy Meadow - 1 1/2 x 3

Specialty Paper - Silver Foil - 1 x 4

DSP - In Good Taste - (2) 2 1/4 x 5 1/4 and (2) 5/8 x 2 1/4 

Instructions:

Stamping:

1. Using Basic Gray Ink stamp the following onto the Soft Suede piece; a shovel, shears, broom, gloves, spade and ladder.  Set aside.

2. Using Night of Navy ink stamp the "Happy Father's Day" sentiment onto the 1 x 2 1/2 Basic White piece.  Set Aside.

3. Using Night of Navy ink stamp the "Thanks for Helping Me Grow" sentiment onto the top left corner of the 4 x 5 1/4 Basic White piece. (Note: this placement is important so that you will not see when the front flap is closed)

Die Cutting:

Using the Garden Dies cut out the following:

1.  All of the pieces that you stamped onto the Soft Suede piece above.

2.  From the Silver Foil: large shovel head, space head and blades for the shears.

3.  From the 1/2 x 3 Night of Navy piece cut out hooks.

4.  From the 1 1/2 x 3 Mossy Meadow piece cut out 2 small and 2 large grass dies. 

5.  Using the Stitched Rectangle Dies cut out the sentiment you stamped onto the 1 x 2 1/2 Basic White piece.

Punching:

1.  Using the Delightful Tag Topper punch and the 1 1/2 x 4 1/4 Night of Navy piece punch out a tag topper from each end of this piece.  Then using your trimmer or paper snips cut it in half. 

2.  Using a score board score only one of the tags at at 1 1/8" from the scalloped end. Burnish well. 

Assemble:

1.  Adhere the scored tag onto the right side of the card about 1 3/4" down from top edge and keeping scored edge flush to side.  Note: the tags should be attached to the front side of the card not the back.

2.  Close the front flap and adhere the other half of the tag 1 3/4" down and matching it up with the other tag so that they just touch. 

Front Flap: 

3.  Adhere one of the Basic Gray piece to the front flap over the tag.

4.  Adhere the DSP onto the Basic Gray on the front flap.

5.  Adhere the Stitched Sentiment label to the 3/4 x 2 1/2 Night of Navy piece then add both to the front flap about 3/8" from top edge.

6.  Adhere two of the grass die cuts to the bottom of the front flap as shown.

7.  Using Mini Dimensionals add the ladder to the left side of the front flap just above the grass as shown.

8.  Apply the stars as desired.


Inside Flap:

9.  Adhere the other Basic Gray piece to inside of flap.

10.  Adhere the DSP onto the Basic Gray on the inside of flap.

11.  Adhere the 5/8 x 2 1/4 DSP strips on the inside of the front flap one about 3/8" from top edge and one about 3/8" from bottom edge.

12.  Adhere the small blue hooks onto the top DSP strip one on each end. (Placement is important so that you can fit the tools onto them)

13.  Adhere the Silver Foil pieces to the shovel, spade and shears.  

14.  Add the shovel to one of the hoods and the shears to the other hook. (Note: I place the shovel onto the left hook and the shears at angle onto the right hook)

15.  Adhere the broom at an angle on the bottom so it looks like it's leaning on a wall.

Inside right side:

16.  Adhere the 4 x 5 1/4 Basic White piece that you stamped earlier to the right side.  

17.  Adhere the grass, spade and gloves as shown to the lower right side.

18.  Thread twine through holes on tags and tie shut!

All done and your Father will love it!  (Note: this stamp set has the sentiments to make this a birthday card if you desire)

I'd love to hear from you so please leave me a comment below the supply list!

Supply list: (Note you can order any of the products below by clicking on any of the pictures below)
Product List
Home & Garden Bundle (English)
$45.00
Stitched Rectangles Dies
$35.00
Delightful Tag Topper Punch
$23.00
In Good Taste Designer Series Paper
$21.00
Basic White 8 1/2" X 11" Cardstock
$10.25
Night Of Navy 8-1/2" X 11" Cardstock
$9.25
Soft Suede 8-1/2" X 11" Cardstock
$9.25
Mossy Meadow 8-1/2" X 11" Cardstock
$9.25
Basic Gray 8-1/2" X 11" Cardstock
$9.25
Silver Foil Sheets
$5.00
Basic Gray Classic Stampin' Pad
$8.00
Night Of Navy Classic Stampin' Pad
$8.00
Resin Stars Embellishments
$8.00
Flowers For Every Season Ribbon Combo Pack
$10.00
Stampin' Dimensionals
$4.25