Tuesday, April 5, 2022

Here Together by Stampin UP!®

Welcome to my blog today!  I really wanted to share this card today in the face of all that is going on in the world today!

I think we all need to gather together and share our creativity with each other and try to lift each other up!

For today's card I used the Here Together Bundle by Stampin Up!® and the new Natural Tones Stampin Blends!

If you like my cards you might want to sign up for my newsletter to get all sorts of fun information!

Here are the Card Cuts, Instructions and supply list for this card!  Hope you like it!


This is a really simple card to make and put together!

Card Cuts: 
Card Base - Blackberry Bliss - 5 1/2 x 8 1/2 scored at 4 1/4
Card stock - Soft Suede - 4 x 5 1/4 
- Basic White 3 3/4 x 5; 4 x 3 1/2 and 4 x 5 1/4

Instructions:

1.  Using Black Memento ink stamp the sentiment onto the 4 x 5 1/4 Basic White piece about 1 1/4" from top edge.

2.  Then using Blackberry Bliss ink and the light ray image stamp several times around the sentiment and down the sheet.

1. On the 4 x 3 1/2 Basic White piece stamp the hand images in Black Memento ink then color in with the Natural Tones Blends. 

2.  Trim it down to 3 3/4 x 3 1/2 then fussy cut around the top of the hands.

3.  Adhere this to the other Basic White piece.

4.  Adhere them both to the Soft Suede piece and wrap the Linen thread around all three pieces towards the top edge.

5.  Adhere them all to the card front.

6.  For the inside of the card stamp the sentiment in Black memento ink as shown and the light ray in the bottom right corner in Blackberry Bliss ink.

7.  Adhere to the inside of the card and you are done!

You can step this card up by adding some embellishments!

Supply List: To order supplies just click on any of the pictures below!
Product List


Monday, April 4, 2022

Flowering Tulips Bundle Birthday Wishes

Welcome to my blog today! I hope your ready for some flowers today!

I'm in love with the dies from this bundle they make such beautiful Tulips and so easy to do!

This card would work great for a Mother's Day Card just change the sentiment!

So let's get going on how to make it:

Card cuts: DSP = Designer Series Paper

Card Base - Calypso Coral - 5 1/2 x 8 1/2 scored at 4 1/4


Card stock - Basic White (2) 4 x 5 1/4

- Evening Evergreen - 1/2 x 3 3/8

DSP - Flowering Fields - (2) 1 x 3 3/4; (1) 1 x 3 3/4; (1) 1/2 x 5 1/4

- Simply Marbleous - 3 x 6 

Instructions:

1. In the top right corner of one of the Basic White pieces cut out the Checkered pattern using the Tulip Dies.

2. Using the Flowering Tulip Stamp set:
* Stamp the long stem and leaves onto each of the Green Strips leaving space for a tulip at the top using Evening Evergreen ink.

 3. Next layer the DSP strips from left to right starting about 1/8" from left side of Basic White piece and leaving the same space between each strip  You should be leaving about 1 3/4" on the right side under the cutout checkered pattern.

4. Now stamp the last stem and leaves onto the Basic White piece on the right side along the bottom edge. 

5. Adhere to the card front.

6. Using the Tulip Dies cut out the pieces for all three tulip with the Simply Marbleous DSP.

*Using the liquid glue adhere the piece together to form the tulips.

7. Adhere the tulips to the card front placing them over the stamped stems and leaves. (Note: the smallest tulip goes onto the basic white section.)

8. Brush the Evening Evergreen strip with a Embossing Buddy if you have one then using Versa Mark ink stamp the sentiment.

*Cover with White Embossing Powder, shake off excess then heat with heat tool.

*Adhere to the card front along the bottom edges of the DSP strips.

9.  Adhere the butterflies as desired onto the card front.

10. Adhere the DSP strip to the bottom edge of the other Basic White piece.  Then stamp the sentiment in Evening Evergreen ink in the center.

* Adhere to the inside of the card.

All done and so simple but so cute!  I hope you will take a try at this card.  I'd love to hear from you so consider leaving me a comment below!

Supply list:  To order just click on any picture below and you'll be taken to my online store.


Sunday, April 3, 2022

Tulip Fields Kaleidoscope Card

So glad you have stopped by my blog today!  My favorite flower is the Tulip so I fell in love with the Tulip Fields Bundle by Stampin Up®.  I also have visiting Holland on my bucket list so I can see the tulips!

For this card I used decided to create a Kaleidoscope look with the stamps and of course had to include the windmill! This card is quick and easy to make!

Here are the card instructions, card cuts and supply list!  

If you like my cards you might want to sign up for my newsletter so you know when I've done new cards!


Card Cuts:
Card Base - Misty Moonlight - 5 1/2 x 8 1/2 scored at 4 1/4
- Basic White - (2) 4 x 5 1/4; 3/4 x 2
- Misty Moonlight - 3 1/2 x 5 1/4
- Daffodil Delight - 2 x 3; 1 x 2 1/4

Instructions:

1. Apply adhesive sheet to the back of the Daffodil Delight piece.

2. Using the Windmill Fields Dies:
A. Cut out the detailed Windmill from the Daffodil Delight piece. 

B. Cut out the Sold Windmill and the blades from the 3 1/2 x 5 1/4 Misty Moonlight piece.

C.  Pull off the backing from Daffodil Delight Windmill and adhere it to the front of the Misty Moonlight Windmill piece.

D.  Poke a hole through the top of the windmill, then attach the Windmill blades using a brad. (Note: do not tighten the brad all the way to allow for the movement of the blades) Set aside.

3. Using the Tulip Fields stamp set and the large tulip field stamp: 

A. Using Misty Moonlight ink stamp the image in all four corner touching the tips in the middle.

B. Using Daffodil Delight ink stamp the image in between the Misty Moonlight images again touching the tips in the middle.

4. Adhere to the card front.

5. ****Very important before you add the windmill to the front you need to adhere the 2 x 3 Daffodil Delight piece to the upper left corner of stamped piece on card front. 

6. I used the Special Moment stamp set for the sentiment (this is now retired so if you don't have it then pick another sentiment.  Using Misty Moonlight ink stamp the sentiment onto the 3/4 x 2 Basic White piece. Then adhere it to the Daffodil Delight piece in the corner.

7.  Using Dimensionals adhere the Windmill to the card front Flush to the bottom of the stamped piece and centered right and left.

8.  Inside of card - Using Misty Moonlight ink stamp the sentiment from the Special Moments Stamp set in the center of the 4 x 5 1/4 Basic White piece then from the Tulip Fields stamp set, stamp the windmill in the bottom right hand corner

9. Adhere to the inside of the card. 

Supply List: 

Product List


Saturday, April 2, 2022

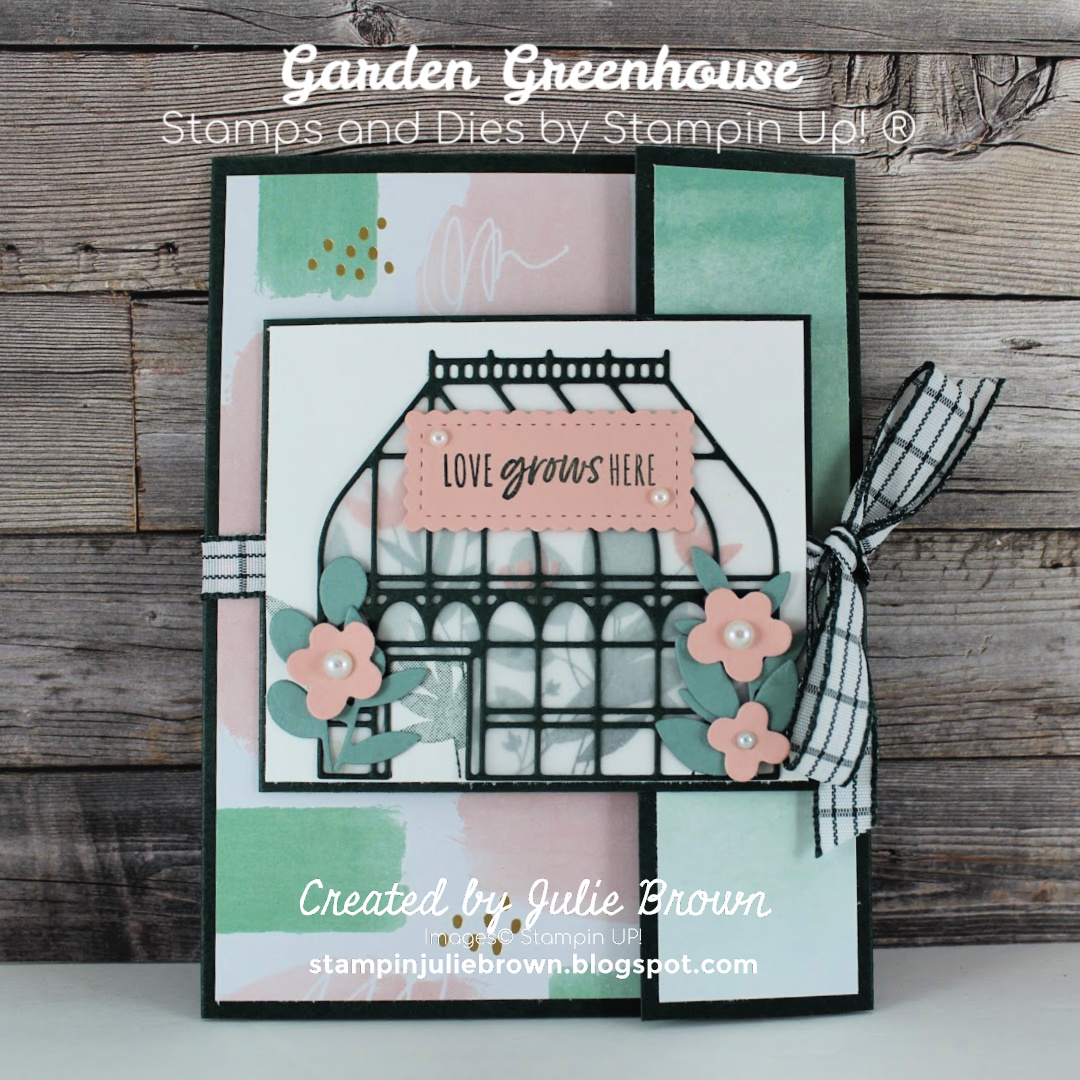
Garden Greenhouse by Stampin Up!® Double fold card

Welcome! Welcome!

I'm so excited to share this card with you!  I did an online retreat with Kylie & Bruno Bertucci, Lisa Curcio and her daughter Gina Curcio Hawley.  They should us some really fun, fun fold layouts and this is my first attempt at one of them.

I used the Garden Greenhouse Bundle and the Abstract Beauty DSP for this card!  Hope you like it! You'll notice I did not stamp on the inside of the large portion of the card because you can either write another note or use glue dots and add a gift card!

Here are the card cuts, instructions, supply list and a video link for this card!


Card Cuts: DSP = Designer Series Paper

Large card base - Evening Evergreen - 5 1/2 x 10 scored at 4 1/4 and 8 1/2

Small card base (Front Card) - Evening Evergreen - 3 x 7 scored at 3 1/2

DSP (large base) -Abstract Beauty - 4 x 5 1/4; 3/4 x 4- Different design - 1 1/4 x 5 1/4

Card Stock: Large Base (Inside) - Basic White -     4 x 5 1/4

(Small card base) - Basic White - 2 7/8 x 3 3/8 (front); 2 3/4 x 3 1/4 (inside) 
-Soft Succulent - 3 x 3 1/2 (leaves)
-Blushing Bride - 2 x 2 (flowers); 1 x 2 (sentiment)

- Evening Evergreen - 3 x 3 1/4 (add adhesive sheets to back before cutting)

Specialty paper:   
Vellum - 3 x 3 1/4

Instructions:

1.  Adhere the 3/4 x 4 DSP to bottom of the  4 x 5 1/4 Basic White then adhere to the inside of Large Card Base.

2. Adhere 4 x 5 1/4 DSP to Front of Large Card Base.

3.  Adhere 1 1/4 x 5 1/4 DSP strip to Front Flap of Large Card base


4. On the 2 3/4 x 3 1/4 Basic White piece stamp sentiment in Evening Evergreen and flowers around sentiment in Blushing Bride ink.

A.  Adhere to the inside of the small card base. 

B. Apply adhesive to back of this card and adhere to the Large card base centering on the DSP on card front. 

C.  Add ribbon as follows:

 1. You will need about 20".  Close the card both Large card base and small card on front. Then wrap ribbon around bringing ends to the right side of the card making sure to make the front and back even with each other.

 2.  Lift ribbon on the front right side on the small card and place a mini glue dot underneath it. Turn card over and working from the binding side.  Place another mini glue dot underneath ribbon on right side then move all the way over to the left side and place another mini glue underneath ribbon. (You will only use three mini glue dots to adhere the ribbon to this point)

5. Now we will work on the front for the small card.

A. Using Evening Evergreen ink stamp the large leaf image onto the 2 7/8 x 3 3/8 Basic White piece making sure to place image flush with the bottom edge.

B. Using Blushing Bride ink add flowers make sure to place one in the middle of the first image where it has a spot open for it. Adhere to the Small card front over the ribbon.

6. Using the Greenhouse Dies:

A. Using the detailed greenhouse die cut out of the 3 x 3 1/4 Evening Evergreen piece (Note: add adhesive sheets before cutting if you have some)

B, Using the other greenhouse die cut out of the Vellum piece.

C. Adhere the detailed Evening Evergreen greenhouse to the Vellum greenhouse. (Note the top of the detailed greenhouse will not be on the vellum one)

D. Cut out several different leaves using the Soft Succulent piece.

E.  Cut out several flowers using the 2 x 2 Blushing Bride piece.

7.  Using mini glue dots (placing them strategically so that they will not be seen or at least covered by the flowers and leaves you will be adding) adhere greenhouse over the stamped image on the small card front.

8. Now add your leaves and flowers as desired (Note: I did trim some of them before adding and used mini glue dots to add the flowers)

9.  Using Evening Evergreen stamp the sentiment onto the 1 x 2 Blushing Bride piece. Then using the Stitched So Sweetly Dies and the smallest rectangle die cut out the sentiment. Adhere to card front as shown.

10.  Add Pearl Basic Jewels to each flower and the sentiment label as shown. 

All done!  Hope you like the card and try this fun fold out!

Click this link for supply list: https://s.tamp.in/PUVOef

Video Link: https://www.youtube.com/watch?v=KCU6kRbEGjs

#osrspringretreat2022


Friday, April 1, 2022

Ranunculus Romance Antique Fun Fold Card

Thanks for popping in today!  I hope things are well for you!

For today's card I got the inspiration from Rose Ward at Stamper's Delight.  I loved the layout that she did and all I did was change up the colors and add a few extra elements.  It's amazing by just changing the color and adding elements you get a different look to the card!

I taught this card at one of my card classes and it was a huge hit!  It looks so hard but it's pretty simple to put together and you get to do lots of stamping!


 Here are the card cuts, instructions, supply list and link to a video I did making this card!


Card Cuts: 
Card Base 1 - Smokey Slate - 6 1/2 x 5 1/2 scored at 2 1/4
Card Base 2 - Soft Succulent - 5 1/4 x 8 scored at 4
Card Stock - Very Vanilla - (2) 3 3/4 x 5, (2) 1 3/4 x 5, 3/4 x 2, 2 x 3 1/2 (Flower)
- Soft Succulent (2) - 2 x 5 1/4, 7/8 x 2 1/8 
Specialty Paper - In Color Shimmer Vellum - 3 x 4
     - Supple Shimmer - 2 1/2 x 3 1/2

Instructions: 
 1.       On the inside and front flap of the Smokey Slate piece second generation stamp as noted: (Note make sure on the front flap that you only get ink on the flap not the back of the card)
a.       Script stamp & R Label stamp – Black Memento Ink
b.       Lace stamp – Basic Gray

2.  On the both of the 3 ¾ x 5 and both of the 1 ¾ x 5 Very Vanilla pieces second generation stamp as noted: (Note on one of the 3 ¾ x 5 you will only be stamping in the lower right hand corner)

a.       Script stamp, R Label Stamp and Lace stamp as stated above.

b.       Eiffel Tower Stamp – Evening Evergreen

c.       Flower – Blackberry Bliss

d.       On the Very Vanilla piece for the inside also stamp the sentiment in Black memento ink as shown.

e.       Using a blending brush and the Evening Evergreen ink blend around the edges of each Very Vanilla piece except for the one for the inside of the card.  You may want to lightly blend over the middle as well to give it more of a vintage look!

3. Adhere the Very Vanilla strips onto the Soft Succulent strips then add them to the front and back flap of the Smokey Slate piece.

4.  Adhere the Soft Succulent card base to the Smokey Slate card base *****Note you will be adhering it so that it opens left to right)

a.       Adhere Very Vanilla piece for the inside of the card as shown.

5. Using the Ranunculus dies cut out the following:

a.       From the In Color shimmer vellum cut out the detailed circle flower and the embossed leaf.

b.       From the Supple Shimmer piece cut out two of the flowers.

c.    Adhere these pieces as shown on the card front.

d.   Tie a knot in ribbon then cut, wrap around the fully stamped Very Vanilla piece then adhere to the card front. 

6.   Adhere to the card front as shown.

7.  On the 2 x 4 Very Vanilla piece stamp the flower in Blackberry Bliss then cut out with die.

a.       Color with Wink of Stella then set aside to dry.

b.       Once it is dry using mini dimensionals adhere to the card front as shown

8. Stamp the script stamp onto the ¾ x 2 making sure to stamp off a couple of times before stamping on the piece.

a.       Using Blackberry Bliss ink stamp the sentiment over the top of the script as shown.

b.       Adhere it to the 7/8 x 2 ½ Soft Succulent piece.

c.       Using Dimensionals adhere it to the card front as shown covering the stem of flower. 

9.    Apply 5 gems as desired.

Supply List: To order any supplies just click on the picture to be taken to my online store!
Product List


I'd love to hear from you so please leave me a comment below!


1.