Friday, March 25, 2022

Boughs & Blossoms Bundle Stamparatus Wreath

So glad you stopped by my blog today!  A few years back I found a template to use with my Stamparatus to help stamp wreaths straight and pretty.  

For this card I decided to use my template again for the background of this wreath.

I brought in the Heart and Home Designer series paper and Wink of Stella to help make this card pop!

Below  you will find the card cuts, instructions, supply list and a video link to see how I created this card!


Card cuts: DSP = Designer Series Paper

Card base - Basic Gray 5 1/2 x 8 1/2 scored at 4 1/4
Card Stock - Evening Evergreen - (4) 1 3/4 x 4, - Basic White - 2 x 6; 4 x 5 1/4, -Basic Gray - 1 x 2

DSP - Heart and Home - Woodgrain pattern- 4 x 4; Flower pattern - 1 1/2 x 4

Instructions:
(Using a piece of Window sheet make a template per video)
Place the Woodgrain DSP onto the template place the leaf stamp in the upper right hand corner so that it does not go off the sheet.  Then stamp first in Shaded Spruce all the way around moving the Woodgrain DSP as shown in the video.  Then move the stamp a little towards the inside of the other stamp and using Soft Succulent do it all again!

Adhere both pieces of DSP together overlapping the Woodgrain over the Flower pattern making the whole piece 4 x 5 1/4.  Then wrap the ribbon around both pieces lining it up just below the Woodgrain DSP.  Adhere both to the card front.

Using the Evening Evergreen pieces and the Bough Punch, punch out 7 of the leaves.  Then using Liquid glue arrange them over the stamped images as shown.

On the 2 x 6 Basic White piece: stamp the more detailed flower once in Pale Papaya and once in Soft Succulent.  Then stamp the other flower using Fresh Freesia twice.  Fussy cut them all out. 

Using a bone folder turn up the edges on the Fresh Freesia Flowers then adhere them as shown using Mini Glue Dots.  Color in with Wink of Stella.

Adhere the Soft succulent flower behind the Pale Papaya flower.  Color in with Wink of Stella.  Then adhere the as shown using Mini Dimensionals.

Using the Dark Evening Evergreen Stamp N Blend marker color in 1 large rhinestone and 14 small rhinestones.  Set aside to dry just a bit.

Using Versa Mark ink stamp the sentiment onto the Basic Gray piece then cover with White embossing powder, shake off excess then heat up with heat tool.  Cut out with the smallest Stiched So Sweetly rectangle die.  (Note: it doesn't look like it will fit but it will)

Adhere to card front centering in the middle of the wreath.

For the inside of the card stamp the flowers in the bottom right hand corner as shown.  Then stamp the sentiment in Basic Gray.  Adhere to the inside of the card.  

Let me know what you think by leaving me a comment below!  Also don't forget the video link is below the supply list!

Supply List:
Product List


Thursday, March 24, 2022

Hello Ladybug Peek A Boo Window

Welcome to my blog! When I saw this bundle by Stampin Up® I fell in love with it and wanted to make a fun card that would pop!

I designed this card from my March card class and wanted to do it using two different designer series paper.  Hope you like both looks!

Today's card is a Peek A Boo window fun fold card.  I used the Hello Ladybug Bundle, Timeless Tulips stamp set, Layering Circles Dies and the Flowering fields designer series paper.

Below you will find the card cuts, instructions and supply list. 

I'd love to hear from you so please leave me a comment below and let me know what you think!


Card Cuts -

Card Base – Poppy Parade/Pumpkin Pie – 5 ½ x 8 ½ scored at 4 ¼

Card Base inside – Basic White – 5 ¼ x 8 scored at 2 and 4.

Card stock – Basic White – (2) 4 x 5 ¼, 2 ¼ x 5 ¼ (Ladybug Body, wings and tulips), ½ x 3 (sentiment), Poppy Parade/Pumpkin Pie – 1 ¾ x 5 ¼, 2 ½ x 2 ½

DSP – Flower Fields (157670) – 3 ¾ x 5 and 1 ½ x 5


Instructions:

1.       Adhere Basic White sheet to front of card base. (Only place adhesive on edges)

2.       Adhere DSP to White sheet on front of card base. (Only place adhesive on edges)

3.       Using the Layering Circle Dies and the #3 Straight edge circle die (or a 2 1/2 Circle Punch) cut out the opening in the front of the card. (Note: try not to get glue on any part of the Circle that you will be cutting out)

4.       Separate the three layers:  Take the Basic white circle and cut again using the #4 Straight edge Circle die (or 2” punch).  Then adhere it to the Pumpkin Pie/Poppy Parade circle.

5.       Stamp the “Hello” sentiment in the top of the circle in Black Memento ink then set aside.

6.       Stamp the walking ladybug in Black Memento ink twice onto the 4 x 5 ¼ section of the inside of card.  Then stamp the Lady bug’s body in either Poppy Parade or Pumpkin Pie. 

7.       Stamp the sentiment above the Lady Bug’s in Black Memento ink, centering.

8.       Adhere the Pumpkin Pie/Poppy Parade strip to the right side of inside of card.

9.       Adhere the DSP strip onto the Pumpkin Pie/Poppy Parade strip. Set aside to dry.

10.   Using the Layering Circle Dies and the #4 scalloped die (or a 2” scalloped circle punch) cut out a circle from the Pumpkin Pie/Poppy Parade 2 ½ x 2 ½ piece.  Set aside.

11.   On the 2 ¼ x 5 ¼ Basic White piece stamp the following making sure to leave room between each image to allow them to be punched and die cut out: 

a.       In Black Memento Ink the Ladybug body

b.       In Pumpkin Pie/Poppy Parade the Ladybug wings

c.       In Black Memento Ink the spots onto the Ladybug wings.

d.       In Pumpkin Pie – stamp off one tulip then stamp full ink the other tulip or In Petal Pink stamp a tulip then in Poppy Parade stamp the next tulip.

e.       In Pear Pizzazz stamp the stems and leaves for the tulips.

12.   First using the Layering Circle Dies and the #5 Die (Or a 1 ¾” scalloped circle punch) cut out the tulips.  Adhere this to the other Scalloped circle.

13.   Then using the Ladybug Builder Punch – Punch out the wings and ladybug body.  Then adhere them together.

14.   In Black Memento ink stamp the sentiment onto the ½ x 3 Basic White piece placing it as far to the right as you can.

Assembly:

1.       Fold the inside of the card together then adhere to the inside of the card base.

2.       Close card and apply three mini dimensionals to the right side of the opening onto the folded section that is showing.

3.       Place the straight circles into the opening onto the mini dimensionals.

4.       Using Mini dimensionals adhere the Ladybug onto the circle just below the “Hello”.

5.       Adhere the Basic White sentiment strip to the card front about ¾” from bottom edge of the DSP and flush to the Basic White piece.

6.       Adhere the Scalloped circles to the left of the sentiment strip as shown. 

1.      Supply List: 

Product List


Monday, March 14, 2022

March 2022 Bruno & Kylie Bertucci's Deomonstrator Training Blog Hop - Seascape & Waves of the Ocean


Welcome to our monthly blog hop!  Your in for a treat!  Just sit back and get your clicking finger ready to Blog Hop all over the world!  What is a blog hop?  It's a way for us to get together and share our card creations with you!  This hop included Demonstrators from all over the world and your going to enjoy all the different cards!  All you have to do is find the list below and click on the name right below my name!  Then just follow the list from blog to blog until you get back here!  

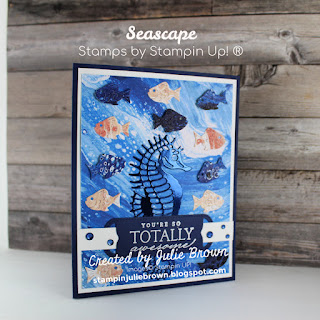
For my card I used the Seascape bundle and the Waves of the Ocean Collection to create this fun Thank you card!

Here are the card cuts and Instructions!  Also below all the Blog Hop names you will find a list of supplies that I used!  Dont' forget to leave a comment below!

Card cuts: DSP = Designer Series Paper
Card base - Night of Navy - 5 1/2 x 8 1/2 scored at 4 1/4
Card Stock - Basic White - (2) 4 x 5 1/4; 1/2 x 4
- Night of Navy - 1 1/4 x 3 1/4
DSP - Waves of the Ocean - 3 3/4 x 5;  (2) 1 1/2 x 4 1/4 (each a different pattern)
Specialty paper - Blue Foil - 2 x 4


Instructions:

1. Using the Seascape Dies:

*Cut out the Sea Horse from the Blue Foil Specialty paper. (Note: It does not fully cut out so you will have to snips a couple places to remove it from the frame)

*Next cut out several fish from the DSP using both sides of the DSP so that you get different colored fish.

2. Using the Waves Dies and Waves of Inspiration Stamp set: 

*Cut out the sentiment label

* Stamp the sentiment in Versa Mark ink then cover with White embossing powder and heat up!

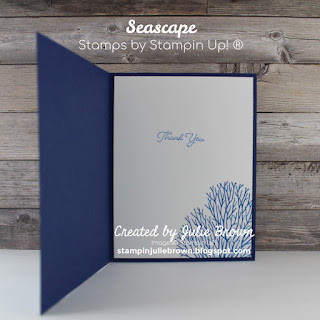
3. On one of the Basic White pieces stamp the coral in the lower right hand corner in Pacific Point ink and the "Sentiment" in the center.

Assembly:

1. Adhere the other Basic White to the card front!

2. Adhere the DSP to the Basic White piece.

3. Adhere the Sea Horse to the DSP centering and flush to the bottom edge.

4. Adhere the fish. (Note: I used dimensionals to pop up all the blue fish)

5. Run the 1/2 x 4 Basic White Strip through the Sentiment label and adhere both to the card front as shown.

6. Adhere the stamped Basic White piece to the inside of the card.

7. Use Wink of Stella to color in the fish on the front for some extra sparkle!

8. Add the Rhinestones to the Basic White strip on either side of the label!

Hope you enjoy this card!  Don't forget my suppy list is just below these names!  

Have fun Hopping today!


Supply List:  

Product List


Monday, March 7, 2022

Kylie's International Projects Highlights - Ranunculus Romance Thank You!


I hope you are all enjoying all the cards in this group!  

This card I had originally made as a Congratulations card for a team swap, but liked it so much I turned it into a Thank you card to send to my customers!

I used the Ranunculus Romance bundle along with the Layering Circle Dies.

I love that this card was designed by using the stamps to create this beautiful background. 

This card is so quick and easy to put together I hope you will try it out!

Don't forget to vote for me!


Card cuts & Intructions:

Card base - Fresh Freesia - 5 1/2 x 8 1/2 scored at 4 1/4
Card stock:
 - Evening Evergreen - (2) 4 x 5 1/4,  2 1/2 x 2 1/2 (scalloped circle), 2 x 3 (leaf) 
- Very Vanilla - (2) 3 3/4 x 5, 2 x 2
-Fresh Freesia - 1 1/2 x 3 (flower)

Instructions

1. Using the Ranunculus Romance stamp set and Fresh Freesia and Evening Evergreen ink, stamp the flower images onto the one of the 3 3/4 x 5 Very Vanilla pieces as shown.
2. Adhere one of the Evening Evergreen 4 x 5 1/4 pieces to the front of the card base.  Then adhere the piece you just stamped to this piece on the card front.
3. Using the Ranunculus Dies cut out the following:  Embossed leaf from the 2 x 3 Evening Evergreen piece.  Flower from the 1 1/2 x 3 Fresh Freesia piece.  Cut the Flower into two pieces. set aside.
4. Using the Layering Circle Dies cut out the following: Scalloped circle from 2 1/2 x 2 1/2 Evening Evergreen piece and Smaller Scalloped circle from the 2 x 2 Very Vanilla piece.
5. Stamp the sentiment from the Ranunculus Romance stamp set onto the Very Vanilla circle.  Then adhere it to the Evening Evergreen circle.  Using dimensionals adhere both to the card front in the upper left corner of the 3 3/4 x 5 Very Vanilla piece on the card front.
6. Then add the Evening Evergreen leave and the Fresh Freesia flowers by sliding them under the sentiment circles.  
7.  On the inside: Stamp the flower and leaves in the lower right hand corner as shown.  Then stamp the sentiment from the "Celebrating You" Stamp set in Evening Evergreen.  Then stamp the leaf image by stamping it off two times then stamping it over the sentiment. 
8.  Adhere the other Evening Evergreen piece to the inside.  Then add the Very vanilla piece.
All done!
9.  Adhere the In Color Jewels as desired onto the card front!

Below you will find a list of supplies used and don't forget to leave me a comment below and let me know what you think!
Product List